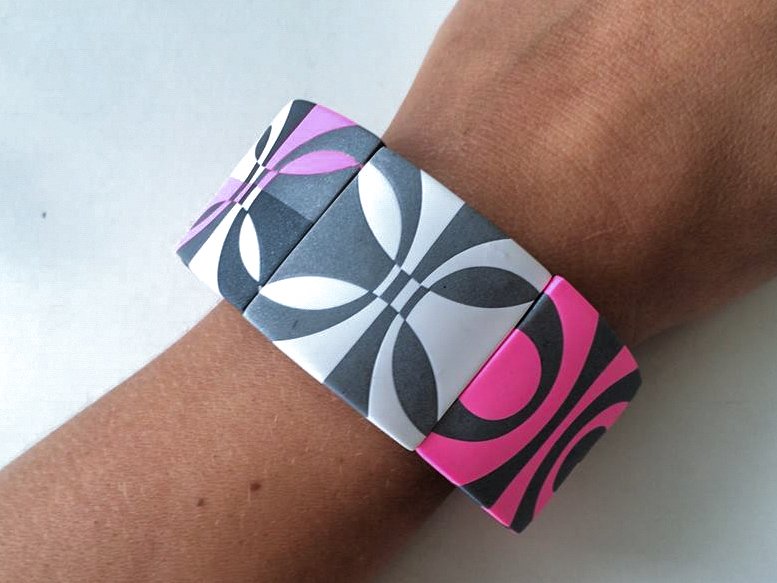
Premo! Mirrored Bracelet
Premo! Mirrored Bracelet
Read More
Mirror, Mirror on the wrist??? Jana shows us a NEAT trick to created mirrored images.
Designed by Jana Honnerova
NOTE: You can use colors you like, but I recommend using contrasting colours. I used a mix (fluorescent pink + white), White, Silver, Wisteria and Graphite Pearl.
Read Less
ADDITIONAL SUPPLIES
Square cutter (apx 1 inch), ruler, brush, craft knife, bamboo skewer or small double pointed knitting needle, metal bracelet blank ( empty soda cans are often used for this!)|Square cutter (apx 1 inch), ruler, brush, craft knife, bamboo skewer or small double pointed knitting needle, metal bracelet blank ( empty soda cans are often used for this!)

Project Instructions
Getting StartedPolymer clay may stain. CLAY MAY DAMAGE UNPROTECTED FURNITURE OR FINISHED SURFACES. DO NOT USE polymer clay on unprotected surfaces. We recommend working on the Sculpey clay mat, wax paper, metal baking sheet, or disposable foil. Start with clean hands and work surface area. Knead clay until soft and smooth. For best results, clean your hands in between colors. Shape clay, pressing pieces together firmly. Bake on oven-proof glass or metal surface at 275°F (130 °C) for 30 minutes per ¼" (6 mm) thickness. For best baking results, use an oven thermometer. DO NOT USE MICROWAVE OVEN. DO NOT EXCEED THE ABOVE TEMPERATURE OR RECOMMENDED BAKING TIME. Wash hands after use. Baking should be completed by an adult.Begin by preheating oven to 275 °F (130 °C). Test temperature with oven thermometer for perfectly cured clay. For best results, condition all clay by running it through the Clay Conditioning Machine for several passes on the widest setting. Fold the clay in half after each pass and insert the fold side into the rollers first.
Blend some premo! White with the premo! Fluorescent Pink about 1 part White to 4 parts Pink. Prepare 4 sheets of clay on medium settings – use contrasting colors. Prepare approx 1¼ inch squares of 2 to 4 colors.

Work on a sheet of paper. Mark 1-3 lines with the same distance from the center of the square on both sides - vertical and horizontal separately.

Cut out circle cutter on one side – touch the marked line. Do it symmetrically and on both sides.

Exchange the semi circles and gently press together

Cut the second semicircles (as shown) on the other mark on the same line and exchange these pieces as well.

Cover the square with sheet of paper and and connect pieces together by smoothing the surface. This will help blend out the seams.

Turn the square by 90° and repeat steps 6 and 7 .Try to continue the pattern. Cover with a sheet of paper and smooth the surface – thoroughly this time.. Don´t press too much, the pattern may slide! Stop for a while when the clay is too hot (too soft).


When the pattern is ready, cut out a square (approx.1 inch) center the pattern. Make another 5-7 squares like this (depends on your wrist size). You can use 2 or 4 colors, you can use different cutter shape etc.


Take a long thick sheet of clay for the bracelet base (the color should be included in the pattern). This piece should be slightly wider than your 1 inch pieces and at least as long as your bracelet blank. Mark parallels with your knife down the length of the bracelet to mark where the channels for holes will be – just press your knife flat to the clay, you´ll get always equal lines. Use a bamboo skewer or small knitting needle to press into the marks and make them deeper.


Carefully lift the bracelet blank from the work surface and roll on the bracelet form. Apply the Bake n' Bond, avoiding the channels for stringing. If you put liquid in the holes, remove it with needle tool. Don't use too much Bake n'Bond (as I did) – the pattern squares might slide – let the Bake n' Bond set up a bit before applying the pattern.


Take all the pattern squares and press them gently onto the bracelet base, centering the pieces with the channels. Do not press them too much on the base – the holes must stay open.

Trim the entire bracelet to each of the mirrored pieces – cut just the base clay. Remove leftover clay. Finally – check if everything is ok (corners adhered, holes open…) and bake the bracelet on the blank as described in Step 1.


Once the beads have baked and cooled thoroughly, string the beads on the beading elastic. Add some matching beads if you wish. Tie off the elastic in each channel and trim. Lightly sand the surfaces and edges. The pieces can buffed as well for a glossed finish.


