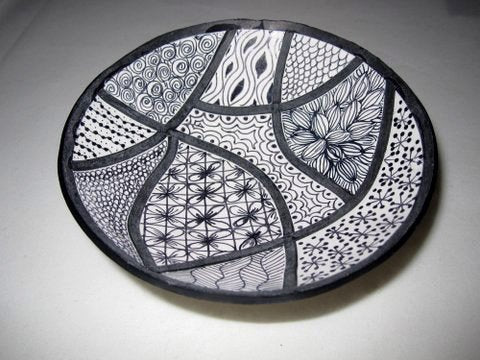
Premo! Zen Doodle Bowl
Premo! Zen Doodle Bowl
Read More
Show off your doodle patterns by creating this great bowl! What an excellent birthday gift or hostess gift this would be too!
Design by Judy Ankerman
Read Less
ADDITIONAL SUPPLIES
Graduated Circle Cookie Cutters, 2 Single-edge blades, Magnets- small, X-acto Knife, Copy Paper, Fat Daddio Dome Bowls (1 small, 1 large), Black Permanent Marker – size 01, Super Glue, PYM II Spray, Sandpaper|Graduated Circle Cookie Cutters, 2 Single-edge blades, Magnets- small, X-acto Knife, Copy Paper, Fat Daddio Dome Bowls (1 small, 1 large), Black Permanent Marker – size 01, Super Glue, PYM II Spray, Sandpaper

Project Instructions
Getting StartedPolymer clay may stain. CLAY MAY DAMAGE UNPROTECTED FURNITURE OR FINISHED SURFACES. DO NOT USE polymer clay on unprotected surfaces. We recommend working on the Sculpey clay mat, wax paper, metal baking sheet, or disposable foil. Start with clean hands and work surface area. Knead clay until soft and smooth. For best results, clean your hands in between colors. Shape clay, pressing pieces together firmly. Bake on oven-proof glass or metal surface at 275°F (130 °C) for 30 minutes per ¼" (6 mm) thickness. For best baking results, use an oven thermometer. DO NOT USE MICROWAVE OVEN. DO NOT EXCEED THE ABOVE TEMPERATURE OR RECOMMENDED BAKING TIME. Wash hands after use. Baking should be completed by an adult.Begin by preheating oven to 275 °F (130 °C). Test temperature with oven thermometer for perfectly cured clay. For best results, condition all clay by running it through the Clay Conditioning Machine for several passes on the widest setting. Fold the clay in half after each pass and insert the fold side into the rollers first.
Place the white clay on a piece of copy paper. (Do not leave it on the paper for too long, as you will leach the clay) Using the largest cookie cutter or another circle template, cut out a circle of white clay

Connect the 2 straight edge blades with the magnets and use it to cut a strip of black clay long enough to go around the outside of the white circle


Apply Sculpey BAke n' Bond, very thinly, around the outside edge of the white circle and attach the strip of black clay. Smooth around the circle to make sure the black strip is firmly adhered to the white circle.
Roll out a long sheet of black on the thinnest setting on the Clay Conditioning Machine. Using the single edge blades with the magnets, cut several strips of clay. Place the strips on the white circle to form random shapes. Trim off edges and overlaps. Gently rub over the entire surface to make sure that the black clay is firmly attached to the white clay circle.


Lay this circle, face down, on the larger bowl. With the heat of your hands, gently work the clay to the shape of the bowl. ) Take your time with this step, as you don’t want to create thick and thin spots in the bowl.)

Cut a donut shape of white clay, on the #1 thickness, and lay this over the small bowl. With the heat of your hands, gently work the clay to the shape of the bowl.


Bake as directed in Step One above. After the clay is baked and cooled, gently remove both from the bowl forms. Apply the super glue to the inner circle of the small donut shaped bowl and attach to the bottom of the larger bowl, forming the base

Lightly sand the inside of the bowl to get a smooth surface.
Draw a different design in each section using the permanent marker. When all the sections are complete, spray with the PYM II (or a similar sealant) to protect your design.


