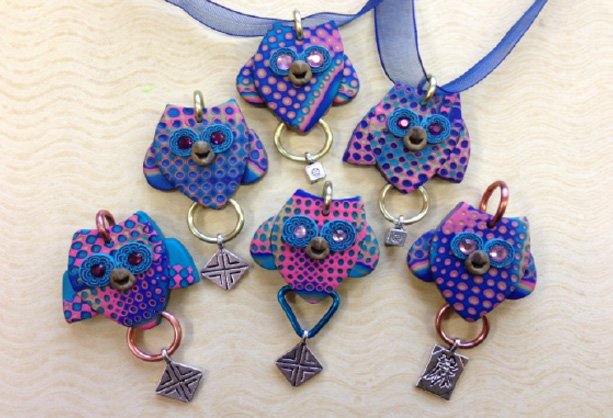
premo Sculpey Mokume Gane Owls
premo Sculpey Mokume Gane Owls
Read More
Create a Charming Owl pendant using color theory and mokume gane techniques presented by Amy Koranek in her video.
Read Less
ADDITIONAL SUPPLIES
Leaf Shape Cutter, approx. 1” x 2”Spray Bottle of Water, Paper towels
Tweezers
2 Large Aluminum Jump Rings (approx. ½” in diameter) in a coordinating color
Charm of your choice to fit on the large jump ring
Necklace Cord or Ribbon
Bic pen cap
Hot Fix Rhinestones – 2 (Designer’s Note: If you are using rhinestone in your designs they need to endure the baking cycle, make sure they are glass or crystal. Acrylic rhinestones will melt in the oven).

Project Instructions
Getting Started:
Please make sure your work area is covered and you are not working on an unprotected surface. We recommend working on the Sculpey® Work ‘n Bake Clay Mat, wax paper, metal baking sheet, or disposable foil. Uncured clay may damage unprotected furniture or finished surfaces. Be sure to cover your crafting area appropriately.
Start with clean hands, unwrap and knead clay until soft and smooth, or condition by running clay though a Pasta Machine. We recommend using a designated machine for clay purposes only. When working with multiple colors, clean hands with soap and water or baby wipes (we have found that baby wipes work best) before switching colors. Shape clay, pressing pieces firmly together. Wash hands after use.
Baking:
Begin by preheating oven to 275 °F (130 °C). After you are done creating; for best results bake clay on an oven-proof surface such metal, aluminum foil, an index card or the Sculpey® Clay Mat at 275°F (130 °C) for 30 minutes per ¼" (6 mm) thickness according to package directions. Oven safe glass or ceramic surfaces are also acceptable for baking; however please note that the baking times may take longer as the glass or ceramic surfaces take longer to heat up. For best baking results, use an oven thermometer. DO NOT USE MICROWAVE OVEN. DO NOT EXCEED THE ABOVE TEMPERATURE OR RECOMMENDED BAKING TIME.
With the Clay Conditioning Machine on the #1 setting create a sheet of each color. Cut 2” X 2” pieces of each color and stack starting with Ultramarine Blue on the bottom, then Blush, then Antique Gold, then Peacock Pearl on top.

Roll over the stack until it has flattened and is about 3” X 3”. It’s easiest to roll if you flip the stack over several times between rolling so that both sides are rolled evenly.

Using the Super Slicer cut your stack into quarters.

Restack the sections ‐ it doesn’t matter if the pieces are perfectly square.

Roll over the stack until it is about 3” X 3” again. Cut the stack in half. Set half aside so you can make another owl later. Make sure the size of the stack will accommodate your cutter.

Spritz the top of the stack with water so the texture block will not stick to it. Press the texture block deeply into the colored stack. Remove carefully. Wipe away all remaining water.

Slice the texture layer off of the colored stack with the Super Slicer.

If you like you can have some extra sheeted clay on hand so that you can lay the lacey piece you just sliced off on the scrap and use it again. Your solid clay color will show through the holes.

Cut a leaf shape out of the color stack.

Turn the leaf shape 1/4 turn and cut the tip of the leaf away.

Turn the leaf shape 1/4 turn and cut the tip of the leaf away.

Attach the wings to the sides of the body.

Make some small balls from the Peacock Pearl and flatten them on the face for eyes with sides touching. Score them with a knife tool.

Poke a hole in between the eyes.

Insert a beak of Antique Gold.

Using the BIC pen cap, poke the tip into the beak for a little mouth.

Push the rhinestones into the eyes. Poke a hole vertically through the forehead above the eyes. Poke a hole horizontally through the tail area. Bake as directed above and allow to cool thoroughly. Put a jump ring through the head and string the ribbon through it. Put a jump ring with the charm on it through the hold in the tail.

