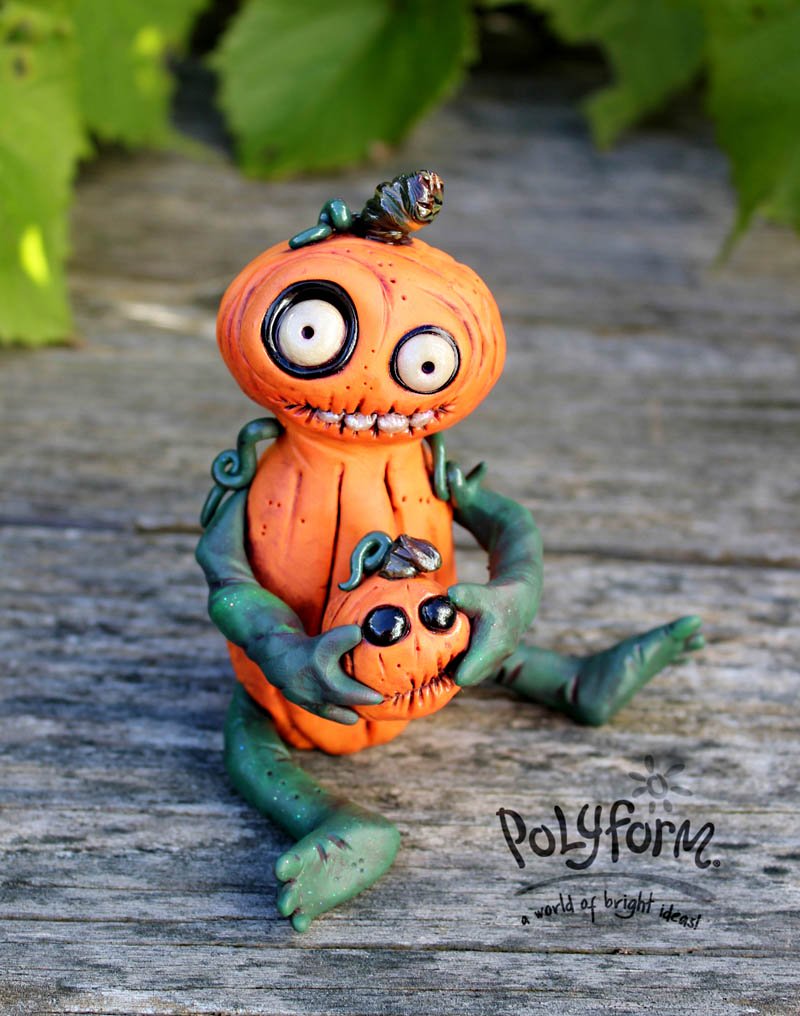
Premo! Pumpkin Imp Tutorial
Premo! Pumpkin Imp Tutorial
Read More
What a cool addition to your Halloween decoration or party table!
Design by Miranda Farrand of Miranda’s Critters
Read Less
ADDITIONAL SUPPLIES
Aluminum foil, needle end tool, pasta machine or clay roller, alphabet rubber stampers, Halloween themed stamps (optional), craft wire,sponge, paint brush, dark acrylic paint such as Black Plum, Neon pink acrylic paint, about 12 inches of 18 gauge craft wire

Project Instructions
Getting Started:Polymer clay may stain. CLAY MAY DAMAGE UNPROTECTED FURNITURE OR FINISHED SURFACES. DO NOT USE polymer clay on unprotected surfaces. We recommend working on the Sculpey® Work ‘n Bake Clay Mat, wax paper, metal baking sheet, or disposable foil. Start with clean hands and work surface area. Knead clay until soft and smooth. For best results, clean your hands in between colors. Shape clay, pressing pieces together firmly. Bake on oven-proof glass or metal surface at 275°F (130 °C) for 30 minutes per ¼" (6 mm) thickness. For best baking results, use an oven thermometer. DO NOT USE MICROWAVE OVEN. DO NOT EXCEED THE ABOVE TEMPERATURE OR RECOMMENDED BAKING TIME. Wash hands after use. Baking should be completed by an adult. Begin by preheating oven to 275 °F (130 °C). Test temperature with oven thermometer for perfectly cured clay. For best results, condition all clay by running it through the Clay Conditioning Machine for several passes on the widest setting. Fold the clay in half after each pass and insert the fold side into the rollers first.
Take a length of aluminum foil and form an egg shaped (slightly flattened on the back) for the body of the Pumpkin Master. Form another smaller flattened round piece for the head (think pumpkin-shaped). Cut a small piece of craft wire that will be used to connect the head to the body once they are covered with clay. Cut four more, longer pieces of craft wire to be used for arms and legs.

Mix one block of Premo Orange with ½ block of Souffle Pumpkin clay. Cover the head and body pieces completely with the well-conditioned orange clay mixture. Work out any air bubbles. You will have left over clay mixture.
Use the medium and/or the large ball tool stylus to hollow out spots for the eyes. Take a small ball of black clay, place in the eye holes, and hollow out the eyes again (this will line the eye holes in black clay). Form small round balls of glow-in-the-dark clay for eyes. Use the small ball stylus tool to poke pupils into the eyes.

Use a needle tool to poke a small hole at the top of the body and the bottom of the head. Insert the small length (about 1 inch) of craft wire into each hole connecting the two pieces. If needed, roll a small snake of the orange clay and blend around the base of the head where it connects to the bottom for added stability. Use the needle tool to impress and add character lines to the face and body. (You can add the eyes after attaching the head to the body if desired). Create a mouth by using the flat rubber end of the medium ball stylus tool and needle pointed tool. Make a slash with the needle tool in the length/shape of the mouth. Use the flat rubber tip to drag down slightly to open. Use the needle tip to press tiny lines around the mouth to give a withered mummy look. Add teeth made from the glow-in-the-dark clay if you like.

We’ll work on the arms and legs next which will resemble vines & leaves. Mix ½ block of the premo! Jungle clay with ¼ block of the premo! Accents Bright Green Pearl clay. You can use other green clay or only one color if you want. Leave the blend rough, not completely mixed. Cover the arms and leg pieces with the green clay. Leave at least ¼ inch of the wire exposed on one end of each. I chose to make my legs slightly bent at the knee with tiny toes on the end. An easier finish would be to taper the ends into fairy-like shoes (pointy).Loosely attach the arms to the body. You will more firmly secure them once you have the little baby pumpkin sculpted.

For the baby pumpkin, make a small pumpkin shaped ball of the leftover orange clay. Add eyes and mouth if desired. Place in the hands of the pumpkin imp and position and firmly attach the arms to the body of the pumpkin imp. Blend in the edges or build up as needed.

To make a stem for one or both of the pumpkins, mix a bit of the green clay with some of the black and orange for a rough mixture. Twist a tiny bit into a stake shape. Attach to the top of the pumpkins with small craft wire lengths. If you have left over green clay, you can make snake-like tendrils for vines to add to your pumpkins (this step optional).

Bake at recommended settings for recommended times. After cooled, apply a patina of acrylic paint. Wipe off paint with barely dampened sponge. This will fill in any detail lines in the clay.Dry brush minute amounts of Neon Pink acrylic paints to features to give depth to the color of the sculpture. Apply Sculpey gloss to eyes, teeth and other features you wish to stand out.


