premo! Mix-it-Up! Combining Simple Cane & Multiple Silk Screens
premo! Mix-it-Up! Combining Simple Cane & Multiple Silk Screens
Read More
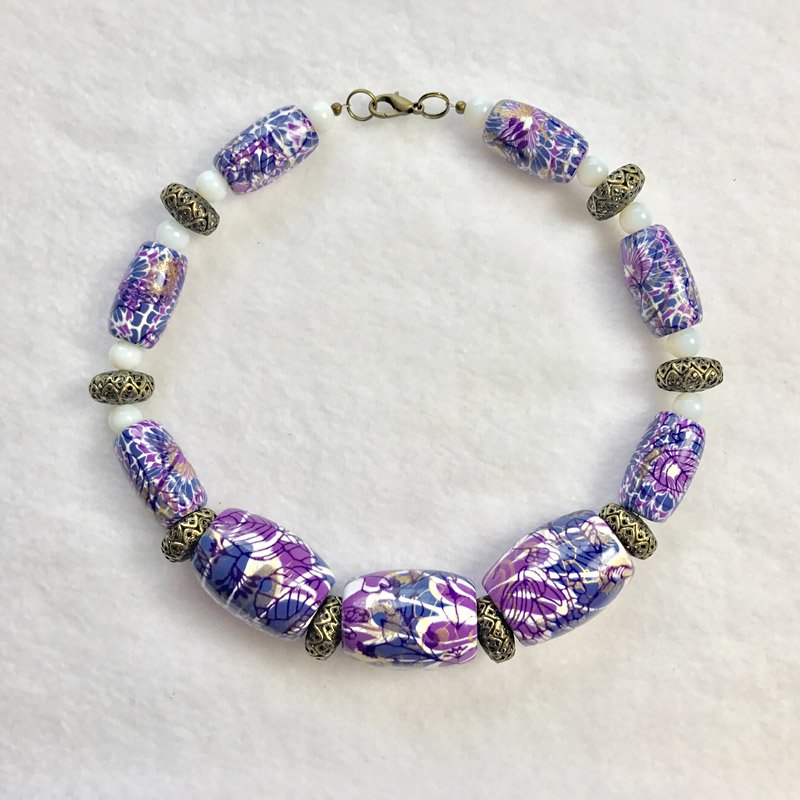
Teresa mixes it up for us - using her clever caning technique with a silkscreen overlay for a unique look.
Design by Teresa Salgado
CLAY:
Sculpey Premo Wisteria, Periwinkle, White, Pearl - 1 block each
Read Less
ADDITIONAL SUPPLIES
CaneBenders (Tinypandora.com) or small acrylic or wood dowels, Brushes for glaze, Dark Purple Acrylic Paint, Wooden Beads, Metal Filigree Spacers, Glass Beads, Stringing Wire, Crimp Beads, Crimp Bead Covers, Lobster Claw Clasp

Project Instructions
Getting Started
Polymer clay may stain. CLAY MAY DAMAGE UNPROTECTED FURNITURE OR FINISHED SURFACES. DO NOT USE polymer clay on unprotected surfaces. We recommend working on the Sculpey clay mat, wax paper, metal baking sheet, or disposable foil. Start with clean hands and work surface area. Knead clay until soft and smooth. For best results, clean your hands in between colors. Shape clay, pressing pieces together firmly. Bake on oven-proof glass or metal surface at 275°F (130 °C) for 30 minutes per ¼" (6 mm) thickness. For best baking results, use an oven thermometer. DO NOT USE MICROWAVE OVEN. DO NOT EXCEED THE ABOVE TEMPERATURE OR RECOMMENDED BAKING TIME. Wash hands after use. Baking should be completed by an adult.
Begin by preheating oven to 275 °F (130 °C). Test temperature with oven thermometer for perfectly cured clay. For best results, condition all clay by running it through the Clay Conditioning Machine for several passes on the widest setting. Fold the clay in half after each pass and insert the fold side into the rollers first.
Make a log of Wisteria and Periwinkle. Blend ½ pkg Premo White with ½ pkg Premo Accents Pearl. Make a sheet of the white mixture on a #3 setting. Wrap each colored log.


Cut the logs in half. Stack, alternating colors. Roll over sides to even them.

Create channels between the colors with a rod smaller than a pencil. (I use CaneBenders) Fill the channels with snakes of the white blend.


Reduce cane to twice its length. Cut in half, place together as shown.

Form a peak at the top, reduce to desired size.


Cut several slices about the thickness of a nickel. Place them together, approximately lining up centers. You can cut a slice in half to make the circle complete. Don’t worry. This type of cane layout is not as exacting as kaleidoscope caning. Remember these will be cut up quite a bit!

Using Sculpey Clay Roller, smooth slices into a connected sheet. Lift sheet with Super Slicer. Run through Sculpey Clay Conditioning Machine at #3 setting.

Silk Screen the sheet with gold, using the Plume screen. Allow to dry. Silk screen again with dark purple, using the Serenity screen. (I LOVE that you get ALL the screens in one kit!). Let dry.

I’m not good at “eyeballingâ€; so, I make templates. Measure the large beads, make a template to cut out your rectangles. (I use the nice coated paper between the silk screens, then make durable templates from any plastic I have handy.) Cut out as many beads as you like.

Wrap the wooden beads with the rectangles of clay. Use the warmth of your handle to settle the rectangle. Trim as necessary.

When you have enough large beads, reduce the cane (I formed it into a square but you don’t have to) so it fits the next size wooden bead you have chosen. Silk screen with two colors as before. Make templates if desired. Cut. Cover beads. Bake all beads at rec time/temp.


Coat beads with Sculpey Gloss or Satin Glaze. Let dry. Assemble your necklace with your chosen spacers, beads and clasp. Enjoy!


