Skip to product information
1 of 1

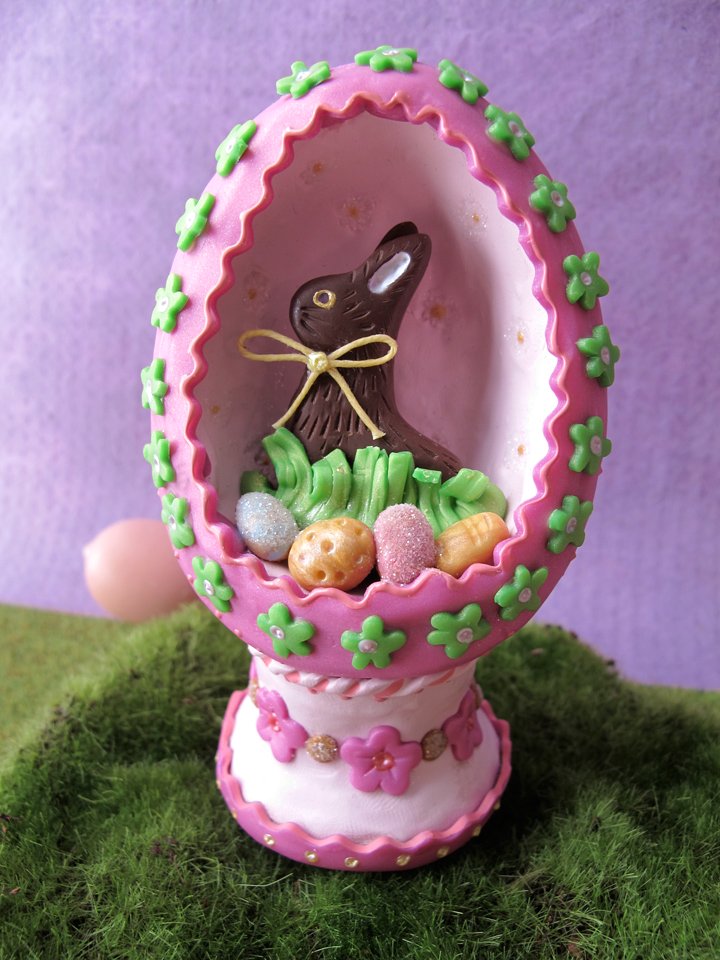
Sculpey Premo™ Chocolate Bunny Egg Diorama

Sculpey Premo™ Chocolate Bunny Egg Diorama

Read More
An egg~cellent project to celebrate Easter and welcome the spring season! Once you try this how-to your creative possibilities are endless with how you choose to decorate your own version of this egg diorama.
Read Less
ADDITIONAL SUPPLIES
  • Ceramic tile
  • 3-D Paint: pink, gold and white
  • Mini flower cutter
  • Wax yellow twine
  • 3 1/4" Paper mache egg
  • Wooden Knob
  • Baby Powder
View full details
Project Instructions
    Getting Started:
Please make sure your work area is covered and you are not working on an unprotected surface. We recommend working on the Sculpey® Oven-Safe Work Mat, wax paper, metal baking sheet, or disposable foil. Uncured clay may damage unprotected furniture or finished surfaces. Be sure to cover your crafting area appropriately.

Start with clean hands, unwrap and knead clay until soft and smooth, or condition by running clay though a Pasta Machine. We recommend using a designated machine for clay purposes only. When working with multiple colors, clean hands with soap and water or baby wipes (we have found that baby wipes work best) before switching colors. Shape clay, pressing pieces firmly together. Wash hands after use.

    Baking:
Begin by preheating oven to 275 °F (130 °C). After you are done creating; for best results bake clay on an oven-proof surface such metal, aluminum foil, an index card or the Sculpey® Clay Mat at 275°F (130 °C) for 30 minutes per 1/4" (6 mm) thickness according to package directions. Oven safe glass or ceramic surfaces are also acceptable for baking; however please note that the baking times may take longer as the glass or ceramic surfaces take longer to heat up. For best baking results, use an oven thermometer. DO NOT USE MICROWAVE OVEN. DO NOT EXCEED THE ABOVE TEMPERATURE OR RECOMMENDED BAKING TIME.
Take one half of your papier mache egg and dust the inside with baby powder (so the clay won’t stick) Use the Sculpey Ultra light clay and press the clay into to make an 1/8 thick mold of one of the half of the egg.
Flip the egg over and press down then trim around the egg to remove the excess clay from your egg and place on your ceramic tile and bake as directed above. Once cooled, lightly sand your egg.
Condition the Ballerina clay and run it through the # 2 setting of the Clay Conditioning Machine and layer it inside of your egg. Use your clay blade to remove the extra clay.  For added detail you can stamp a flower pattern in your clay. 
Condition the Magenta Pearl clay and run it through the #2 setting of the Clay Conditioning Machine. Then drape it over the back your egg and smooth out any air bubbles. Slice the excess clay off but leave enough to fold over the edge of your egg. Don’t worry if your Magenta and Ballerina clay don’t match up because we will be framing in the window with another piece of magenta clay later. 
Take your wooden knob (we picked one up that had a flat bottom and indent on the other side so the egg can sit in it) and add some Oven Bake Clay Adhesvie in the center then add some scrap clay on top. This is so your egg will bond better then placed on top. Roll out a small snake to wrap around the top of the wooden knob and blend it into the magenta egg.
With the Clay Conditioning Machine on setting #2 roll the Ballerina clay through and cover the wooden base. For added strength you might want to add some Oven Bake Clay Adhesive to the wooden knob.
Now use your creativity and embellish your base however you like. Try adding small Magenta flowers around with gold clay dots. A wavy trim on the bottom of the base and a rope like design on top will add interest to the base.
Sculpt out of a piece of the Burnt Umber clay for the chocolate bunny. Use the Clay Tool Starter Set to create the ears, eyes and fur of your bunny.

To make the grass use Bright Green Pearl clay. Cut three sides of your rectangle shape with your slicer and one side with your rigid slice to represent the top of grass. Slice out blades of grass. Use 18K Gold clay to make the mini eggs. Use a little Oven Bake Clay Adhesive to attached your pieces to the inside of the egg.

Use another piece of Magenta clay and run it through the # 2 setting of the Clay Conditioning Machine. Then use your wavy bladel to make two stripes for framing your diorama eggs window. Blend the edges into the egg.

Add any other clay details to your eggs where needed.  Try using a mini flower cutter to make flowers in Bright Green Pearl for the trim around the egg opening.

Place your egg diorama on a smooth ceramic tile and bake as directed above, allow to cool.

Once cooled you can add details to your egg with 3D paint – dots, swirls etc. Glue a wax twine bow onto your bunny and add a sparkle of glitter!