Skip to product information
1 of 1

Sculpey Premo™ Speedball Earring Collaboration

Sculpey Premo™ Speedball Earring Collaboration

Designed by Amy Koranek
Read More
In this tutorial I will describe my process for carving the block and then give suggestions about how to finish the textured clay pieces into earrings. I will show several different ways to use the same design with different clays. It will be up to you to decide how you want to finish the earrings with your own findings. I have plenty of inspiration ideas to show you! COMPLETION TIME: 90 Minutes to make, bake, and assemble each style
Read Less
ADDITIONAL SUPPLIES
  • Speedball Speedy-Carve 4 X 6 Block Printing Carving Block
  • Speedball Carving Tools
  • Pencil
  • Corn starch
  • Paintbrushes (2)
  • Flat nose pliers
  • Coordinating post toppers for earrings
  • Coordinating jump rings for earrings
  • Coordinating charms for earrings
View full details
Project Instructions

Step 1

Getting Started with Sculpey Premo™ and Sculpey Soufflé™ Clays:

Start with clean hands, unwrap and knead clay until soft and smooth, or condition by running clay though a Pasta Machine. We recommend using a designated machine for clay purposes only. When working with multiple colors, clean hands with soap and water or baby wipes (we have found that baby wipes work best) before switching colors. Shape clay, pressing pieces firmly together. Wash hands after use.

Baking:

Begin by preheating oven to 275 °F (130 °C). After you are done creating; for best results bake clay on an oven-proof surface such as metal, aluminum foil, or
an index card or the Sculpey® Oven Safe Work Mat at 275°F (130 °C) for 30 minutes per 1/4" (6 mm) thickness according to package directions. Oven safe glass or ceramic surfaces are also acceptable for baking; however please note that the baking times may take longer as the glass or ceramic surfaces take longer to heat up. For best baking results, use an oven thermometer. DO NOT USE MICROWAVE OVEN. DO NOT EXCEED THE ABOVE TEMPERATURE OR RECOMMENDED BAKING TIME.

Getting Started with Liquid Sculpey®:

Please make sure your work area is covered and you are not working on an unprotected surface. We recommend working on the Sculpey® Oven Safe Work Mat, wax paper, metal baking sheet, or disposable foil. Uncured Liquid Polymer Clay may damage unprotected furniture or finished surfaces. Be sure to cover your crafting area appropriately. - Stir Liquid Sculpey® completely. Thin with Sculpey® Liquid Clay Softener as needed - Wash hands after use (we have found that baby wipes work best)

Baking:

 -It is important to use oven thermometer when you bake the liquids so that you can ensure your oven is at the correct temperature.

-Do not microwave the liquids. They must be baked in a Preheated oven at 275 ºF (130 ºC) for liquid colors and 300 ºF (149 ºC) for Clear – Do not exceed baking temperatures.

-If your piece is less than 1/4” bake for 15 minutes. For thicker pieces that are 1/4” or above bake for 30 minutes.

-If your liquid project has become yellowed or discolored in the oven, when you remake it, tent it by placing either – folding an index card in half and placing your project under it by using aluminum foil over your project.

Step 2

I didn’t want to carve the entire block, so I first divided it as shown. For these
projects I’m just using 1/2 of the block. You can use more or less depending on
your design.

Step 3

Sketch a design with pencil on the carving block. You can start with basic lines and add more as you go. If this is your first time carving, keep the design open with
lines far enough apart to leave areas for adding Liquid Sculpey® later.

Step 4

I started with Tip #2 in the carving handle. Carve shallow lines at first and
then you can go back and make them deeper as desired.

Step 5

To test the depth of your carving, you can press a piece of scrap clay into an area
that you have carved.

Step 6

Peel the clay piece out to see if the lines are deep enough.

Step 7

Keep carving the major lines first.

Step 8

Once all the initial lines are carved, it’s time to test the texture and design. Use
some corn starch to prepare the carving block so that the clay won’t stick.
This is especially important if you want to use the block repeatedly. Use a
small paintbrush to get the corn starch in every line.

Step 9

Brush away as much of the excess corn starch as you possibly can. These two corn
starch steps should be repeated each and every time you use the block with clay
to keep the block clean.

Step 10

This will be the initial test piece. Roll clay to a very thin sheet - less than 1/8”
thick.

Press it on top of the carving block. Apply heavy pressure with fingertips starting in the center and working outward to the edges. Roll over the clay to make sure
the back is flat with a Clay Roller.

Step 11

Carefully peel the sheet back.

Step 12

My initial test looks really good. I decided to add more details.

Step 13

For wider line details, I used the #3 tip. I started deeper with carving a line and
then gradually pulled the tip up shallower to make tapered cuts.

Step 14

Here’s my entire carved block with different size lines. Before proceeding with making textured clay sheets for earrings, ALWAYS apply more corn starch before every impression as we did in Steps 8-9.

Step 15

For this sample, I used Premo™ Gray Granite. I like the way it turned out.

Step 16

Once the clay has been textured with the carved block, it’s easy to cut it into pieces
with cutters. Here I cut a medium sized square with a cutter.

Step 17

Then I used the side of the same size cutter to cut the square in half so I would have two rectangles with slightly curved corners. Poke holes in the tops of the
rectangles for adding jump rings later.

Bake the rectangles following the baking instructions for Sculpey Premo™ and allow to cool before handling.

Step 18

I laid the rectangles on top of a silicone baking mat next. This is not important to
have the mat, but it did help to keep the clay pieces from moving around while
I applied Liquid Sculpey® (LS).

First apply drops of LS to areas where you would like to. Don’t try to fill the whole
area at once with LS. We can always add more as needed.

Step 19

Drag the LS to fill the areas with a Needle Tool.

Bake again to set the LS following the baking instructions for LS. Allow to cool
completely before handling.

Step 20

This set has cool metal streamers added to the backs with a jump ring.

Step 21

Here’s a look at the finished earrings from the front with silver tone ball posts,
silver jump rings, and the metal streamers hanging from the back.

Step 22

Cut out another larger square from the Gray Granite textured clay.

Step 23

Then I turned that square into a diamond and cut that in half with a Clay Blade.

Step 24

Be sure to poke holes at the top of the pieces for later adding jump rings. Bake
following the baking instructions for Sculpey Premo™. Allow to cool before
handling.

Step 25

Add some areas of Black LS and White LS as in Steps 18-19 above. After adding LS, bake again following the baking instructions. Finish as desired with jump rings and
findings.

Step 26

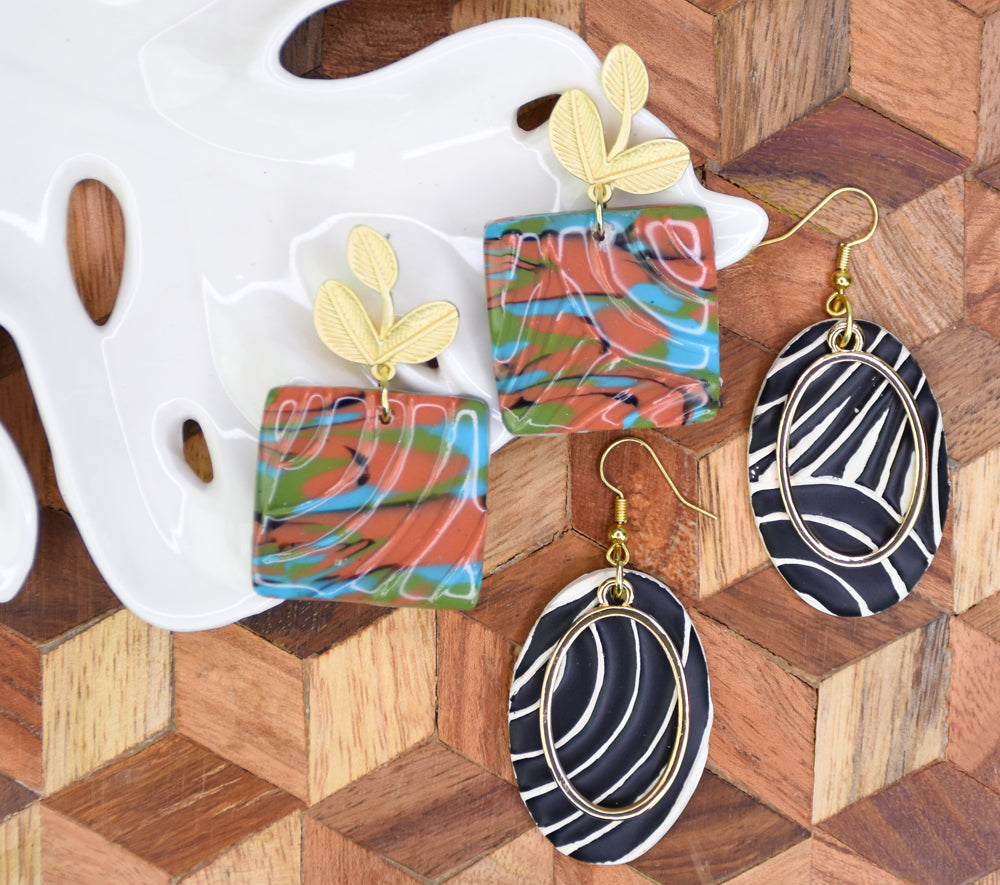
This also works great with patterned or marbled clays as in this inspiration. I used
Premo™ Terra Cotta, Premo™ Spanish Olive, Premo™ Turquoise, and Soufflé™ Poppy Seed to create this Mokume Gane sheet. There are loads of tutorials on the sculpey.com website to guide you through the Mokume Gane process
and other marbled techniques.

Step 27

From this textured sheet I cut large and small squares, poked holes for jump rings,
and baked them following the baking instructions for Sculpey Premo™. Allow all
pieces to cool completely before handling.

Step 28

Next apply Clear LS to the designs and spread it into all the recessed areas. Bake
again following the baking instructions for Sculpey® LS.

Step 29

Finish as desired with your own earring findings - this is the large set.

Step 30

For the smaller set I used smaller findings.

Step 31

For the final inspiration I used Igloo Soufflé™ and Black LS.

Step 32

Cut out two large ovals using cutters from the textured Igloo sheet.

Step 33

Poke holes for jump rings. Bake following the baking instructions for Sculpey
Soufflé™.

Step 34

Apply Black LS as in Steps 18-19 above.

Bake again following the baking instructions for Sculpey® LS. Allow to cool
completely before handling.

Step 35

In this inspiration I finished with open oval shaped bezels, jump rings, and ear wires.