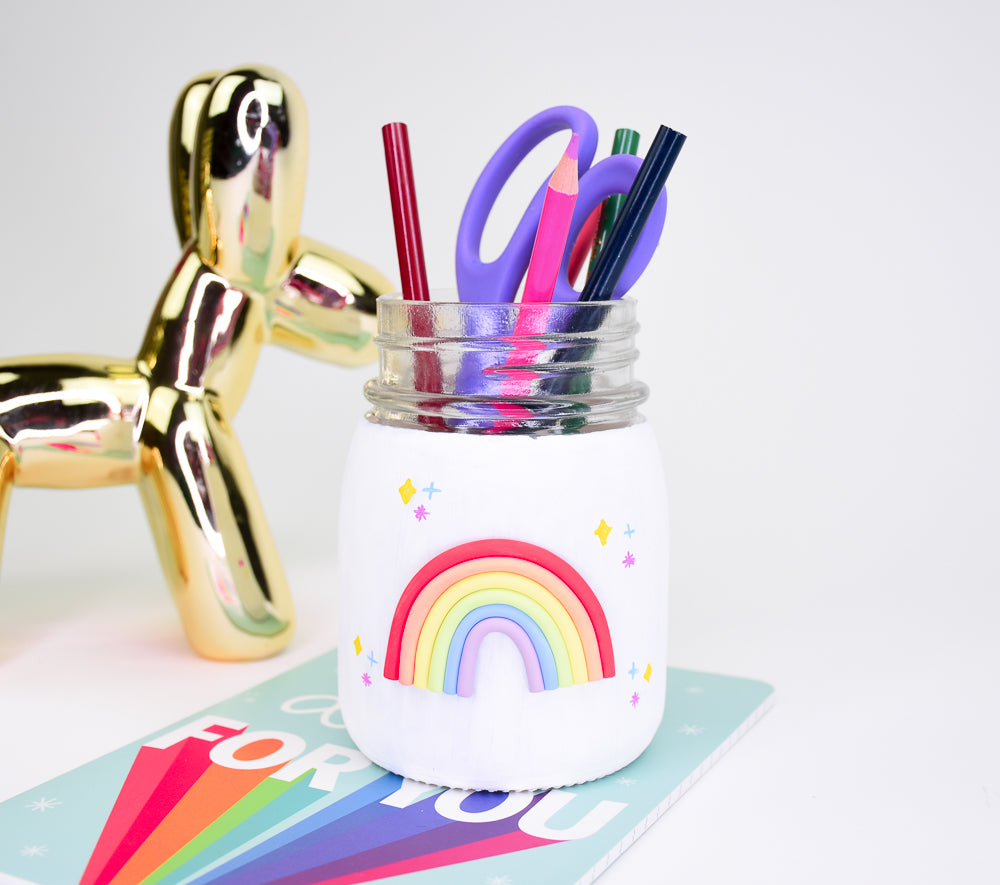
Sculpey III® Rainbow Mason Jar
Sculpey III® Rainbow Mason Jar
Designed by Precious Nunez
Read More
This Rainbow Mason Jar makes a perfect decoration for your classroom, desk, or craft room. Repurpose a Mason jar with this super cute yet simple project to hold your supplies, pencils, popsicle sticks, crayons, or stickers; it’s up to your imagination!
Time to complete: Sculpting time approximately 15 minutes and approximately 30 minutes to paint
Read Less
ADDITIONAL SUPPLIES
- Mason Jar
- Paint brush (big and small)
- Paint: white, pink, blue, and yellow
- Super Glue
- X-Acto knife

Project Instructions
Step 1
- Getting Started:
Start with clean hands, unwrap and knead clay until soft and smooth, or condition by running clay though a Pasta Machine. We recommend using a designated machine for clay purposes only. When working with multiple colors, clean hands with soap and water or baby wipes (we have found that baby wipes work best) before switching colors. Shape clay, pressing pieces firmly together. Wash hands after use.
- Baking (also called Curing):
Step 2
Roll one small ball in each color of Red, Orange, Yellow, Green, Blue, and Purple. To make these colors mix Yellow + Red = Orange, Yellow + Blue = Green, Red + Blue = Purple. You can mix small bits of white clay to lighten any color if you desire
Step 3
Roll out each color into a long thin snake about 3-4 inches long
Step 4
Take the smooth side of the jar and wrap the red snake into an arch and size it according to your preference.
Step 5
Continue to add each color in order underneath the red arch shown on the image: Red, Orange, Yellow, Green, Blue, and Purple.
Step 6
After completing, trim the bottoms of the rainbow to make clean edges and slightly press the rainbow securely onto the mason jar. Bake the rainbow onto the jar according to Step 1.
Step 7
Once the rainbow is baked, pop the rainbow off and paint the jar completely. Do multiple coats to make the paint opaque and let it dry completely
Step 8
Super glue the back of the rainbow and stick it to the jar.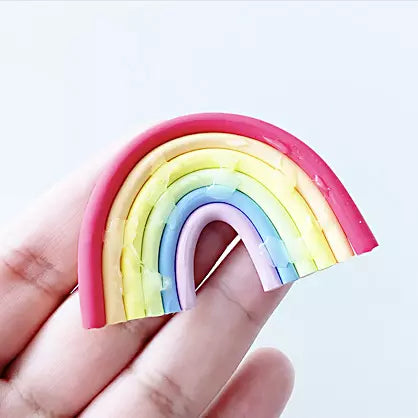
Step 9
Paint stars and sparkles around the jar to give additional details as shown.