Skip to product information
1 of 1

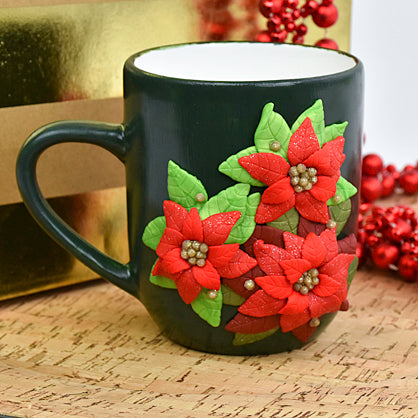
Premo Sculpey® Holiday Set Poinsettia Mug

Premo Sculpey® Holiday Set Poinsettia Mug

Designed by Amy Koranek
Read More

Decorate mugs for every member of your family this holiday season with Premo Holiday Colors. The Flowers Silicone Bakeable Mold makes it easy for you to create realistic petals and leaves for your favorite seasonal accents.


COMPLETION TIME:

90 Minutes to make and bake.

Read Less
ADDITIONAL SUPPLIES
  • Bakeable mug in favorite holiday colors
  • Scrap paper or deli sheet or wax paper
  • Permanent silicone or quick drying glue
  • A little prop to put under the handle so that the mug remains level on its side during baking
View full details
Project Instructions

Step 1

Getting Started:

Please make sure your work area is covered and you are not working on an unprotected surface. We recommend working on the Sculpey® Oven-Safe Work Mat, wax paper, metal baking sheet, or disposable foil. Uncured clay may damage unprotected furniture or finished surfaces. Be sure to cover your crafting area appropriately.

Start with clean hands, unwrap and knead clay until soft and smooth, or condition by running clay though a Pasta Machine. We recommend using a designated machine for clay purposes only. When working with multiple colors, clean hands with soap and water or baby wipes (we have found that baby wipes work best) before switching colors. Shape clay, pressing pieces firmly together. Wash hands after use.

Baking (also called Curing):

Begin by preheating oven to 275 °F (130 °C). After you are done creating; for best results bake/cure clay on an oven-proof surface such metal, aluminum foil, an index card or the Sculpey® Clay Mat at 275°F (130 °C) for 30 minutes per 1/4" (6
mm) thickness according to package directions. Oven safe glass or ceramic
surfaces are also acceptable for baking/curing; however please note that the
baking/curing times may take longer as the glass or ceramic surfaces take
longer to heat up. For best baking results, use an oven thermometer. DO NOT USE
MICROWAVE OVEN. DO NOT EXCEED THE ABOVE TEMPERATURE OR RECOMMENDED BAKING TIME.

Step 2

I mixed some deep, rich, custom colors:

1/4 bar Bright Green Pearl + 1/16 bar Twinkle Twinkle;

1/16 bar White Gold Glitter + 1/16 Cadmium Red;

1/4 bar Cadmium Red + 1/16 bar Twinkle Twinkle;

1/16 bar Cadmium Red + 1/16 bar Yellow Gold Glitter.

 We will also use the Bright Green Pearl, Yellow Gold Glitter, and the Cadmium Red straight from the package.

I used my pasta machine to mix the colors which is why they are in little sheets. But you can hand mix or mix with a hand roller if you like. The pasta machine is not necessary for this project.

Step 3

Now make a series of fresh leaves and petals from the mixed colors using the Silicone Flowers Mold. This mold allows you to create a lot of petals and leaf pieces so that you do not have to hand shape them. The first step is to fill a cavity in the mold with the color of your choice. Here I have filled the largest poinsettia shape with the Cad Red/Twinkle mix

Step 4

Shave any excess clay from the back with the Super Slicer level to the mold.

Step 5

This is how the cavity will look when it is filled level.

Step 6

Gently flex the mold to remove a perfectly shaped little petal or leaf.

Step 7

Take your time and make several large petals. Arrange all the unbaked petals on a piece of paper so they are easily moved and manipulated.

Step 8

Make several more of the large leaves in the Bright Green/Twinkle mix.

Step 9

Continue making lots of petals in the different shades. I made medium petals in the Cad Red/Yellow Gold and I made small petals in straight Cad Red. This set of leaves and petals will be my largest poinsettia on the mug.

Step 10

Make two more sets of large leaves using straight Bright Green Pearl. Make medium sized petals in the Cad Red/White Gold mix. Make small petals in Cad Red.

Step 11

Position your mug with a little prop holding up the handle parallel to your work surface so that you can see one side level. Place a large flat disc of Cad Red/Twinkle on the bottom right area of the mug. Push a divot in the center with the 12 mm ball tool to create a little well to arrange the leaves and petals around.

Step 12

First make the largest poinsettia. Position the large Bright Green/Twinkle leaves around the disc. Don’t space them evenly so they have a more natural arrangement. Bend each leaf with your fingertips so they don’t look exactly alike. That’s what makes this mold so special. You can make lots of leaves and petals using the same mold but then arrange them so they all look different.

Step 13

Add the largest petals next on top of the leaves and on top of the disc. The disc in the background helps to hold them up.

Step 14

Next add medium and small sized petals over the top of the large petals.

Step 15

Make two more discs to hold up the smaller poinsettias. Start with the leaves in the background first.

Step 16

Add medium and small petals over the top of the leaves. The rubber tipped tools from the Style & Detail Set make positioning and moving the small parts around easy.

Step 17

When you are happy with the arrangement of the petals and leaves add small pearls of Yellow Gold Glitter to the centers of the flowers with the Small Etch ‘n Pearl. Add some random pearls here and there in your design.

Step 18

Lay your mug on its side to bake it in the oven. Bake following the baking instructions for Premo. Allow it to cool completely. Then gently pop the floral design off with your fingertip and glue it back on permanently with silicone glue or super glue. Keep the mug laying down while the glue dries.

Your masterpiece is waterproof and useful but it is also art, so treat it like art. Hand wash after each use.