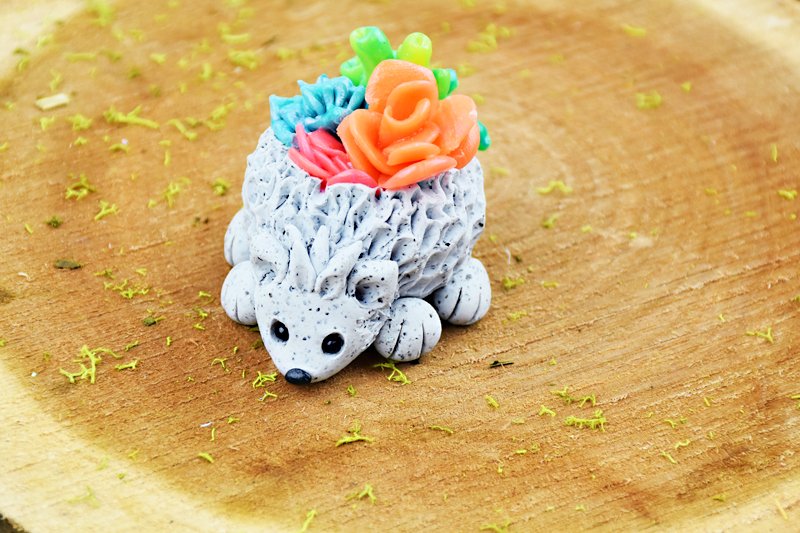
Original Sculpey® Granite Faux Stone Hedgehog Planter
Original Sculpey® Granite Faux Stone Hedgehog Planter
Designed by Amy Koranek
Read More
Read Less
Original Sculpey Granite is the perfect clay to make the cutest faux stone hedgehog with a bonus! He's actually a planter, holding the sweetest little Sculpey III faux succulents.
ADDITIONAL SUPPLIES
- Paintbrush

Project Instructions
- Getting Started:
Start with clean hands, unwrap and knead clay until soft and smooth, or condition by running clay though a Pasta Machine. We recommend using a designated machine for clay purposes only. When working with multiple colors, clean hands with soap and water or baby wipes (we have found that baby wipes work best) before switching colors. Shape clay, pressing pieces firmly together. Wash hands after use.
- Baking:
From 1.5 ounces of the Granite clay, make a ball.

Press the ball down so it has a flat bottom. Carefully cut off the top curve from the ball and set this piece aside.

From more of the Granite clay, make a proportionately sized head and four little paws. These parts can all be teardrop shaped.

Push the head onto the front of the body. Position the tapered parts of the feet under the body

Use the pointed tool to drag furry lines across the top of the head

Make two little triangle shaped ears. Position them on the top of the head and poke a hole in each one with the pointed tool.

Use the ball tool to make divots in the top of the hedgehog’s back. This is to create a little well for the succulents to sit in.

Set the hedgehog aside for now. Next let’s mix up some custom colors for the succulents. I’m making colorful succulents that aren’t really realistic, but I think they look cute. Each color that we make will start with 1/8 bar of Sculpey III Translucent. You can add more or use less translucent depending on how deep you want your colors. For the pinkish orange color I used 1/8 bar of Translucent and a little Just Orange and a little Candy Pink.

Condition each color and then smash them together

Keep kneading the colors until they are almost completely mixed.

For the bluish color I used 1/8 bar of Translucent plus a little Spring Lilac and a little Teal.

Knead the color until it is as mixed as you would like. I never mixed my colors completely so they would be a little marbled.

For the greenish color I used 1/8 bar of Translucent and a tiny bit of Teal and a small amount of Granny Smith.

Mix the colors to the desired amount.

Lastly, I made an orangish color. I used 1/8 bar of Translucent and a bit of Just Orange.

Mix to a desired blend.

Roll a rope from the orange blend. Cut some smaller and some larger.

For the pancake plant (Kalanchoe), I smashed the pieces flat between my finger and thumb allowing them to curl or be different shapes so they look more organic.

Curl one of the larger petals up for the center piece. Then layer the flat petals around the center.

For the blue succulents (Sempervivum), roll a rope that is tapered on one end and fatter on the other. Cut off lots of little pieces.

Flatten each piece with your fingers. Then pinch a point on each one along the edge.

Start with two very small petals in the center, and then arrange the petals around the center starting with smaller ones in the middle and working outward with larger ones.

For the green succulents (Jade Plant), roll a tapered log and cut off lots of little pieces.

Roll each of these into a tapered log.

Group the pointed ends together into a little bundle. Use the poker tool to make little shallow openings in the thick ends.

Position the Jade Plant toward the back of the hedgehog and use the ball tool to push the Granite clay around the plant to hold it in place.

Add the Sempervivum next and use the scoop shaped tool to help settle it into place between petals.

Position the Kalanchoe next, and use the pointer tool to help push the plant down through the center. Nestle some flat pink blend petals to take up any empty space that is left. .

Next, the hedgehog needs some texture. Start around the top edge of the “planter” and drag furry lines with the pointer tool. This motion will also help keep the succulents in place.

Keep adding more and more furry lines working your way down from the top to the bottom. Leave the face and the paws unfurry.

I thought the head of my little guy looked a little plain, so I added some thick fur pieces using more Granite clay between the ears. Poke holes in for eye sockets and fill these with little Black beady eyes. Add a Black nose. Score toe lines in the paws.

Bake your little garden sculpture following the baking instructions above in Step 1.
When he is completely cool, you can brush a thin layer of Sculpey Glossy Glaze all over the succulents as well as the eyes and the nose. Allow to dry completely before handling


