Liquid Sculpey® Jellyfish Suncatcher
Liquid Sculpey® Jellyfish Suncatcher
Designed by Amy Koranek
Read More
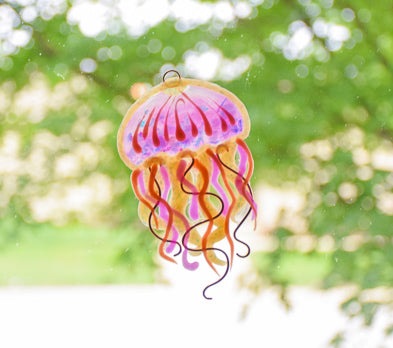
Amethyst Pearl combined with Opal Premo, Rose Gold Liquid Sculpey, and pretty rose gold wire makes a delicate jellyfish.
TIME TO COMPLETE:
2 Hours to make and bake twice
Read Less
ADDITIONAL SUPPLIES
- Paper towel
- 5” x 7” Clean and clear glass
- Printed pattern of a jelly fish - optional
- 10 mm Rose gold jump ring
- 1.6 mm (14g) Rose gold wire
- Clear iridescent glitter flakes
- Tweezers
- Wire cutters
- Wire wrapping pliers

Project Instructions
- Getting Started with Liquid Sculpey®:
- Baking:
- It is important to use oven thermometer when you bake the liquids so that you can ensure your oven is at the correct temperature.
- Do not microwave the liquids. They must be baked in a Preheated oven at 275 ºF (130 ºC) for liquid colors and 300 ºF (149 ºC) for Clear – Do not exceed baking temperatures.
- If your piece is less than 1/4” bake for 15 minutes. For thicker pieces that are 1/4” or above bake for 30 minutes.
- If your liquid project has become yellowed or discolored in the oven, when you remake it, tent it by placing either – folding an index card in half and placing your project under it or by using aluminum foil over your project.
First a drawing of a jellyfish will be very helpful. You can use your own sketch or a free online printout will work. I printed a page from the internet then used my printer to enlarge the jellyfish that I selected to the size that I wanted. I chose a jellyfish that is really very simple in shape.

Place the jellyfish drawing under a clean clear piece of glass.

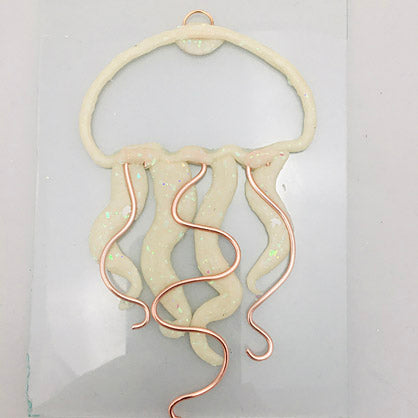
Flatten a small ball of Opal Premo™ at the very top of the jellyfish body. Embed the rose gold jump ring in the clay.

Border the body of the jellyfish with a rope of Opal Premo™. Use the rope to sandwich the jump ring in between the layers of clay.

Flatten ropes of Opal and press them into place along the bottom of the jellyfish body. Make them different lengths and curvy in a freestyle manner.

Make curly tentacles from rose gold wire. The longest tentacle in the middle starts with a 5” length of wire. I used the Plastic Tube Roller and wire wrapping pliers to help me make large and small curls in the wire.

I shortened the tentacle by making the larger curves more compressed.

Make three different lengths of tentacles using 5”, 4”, and 3” pieces of wire. Press them into place on the jelly fish outline.

Use small pieces of Opal to cover up the tops of each tentacle. Press the lengths of the tentacles into the clay where they overlap.

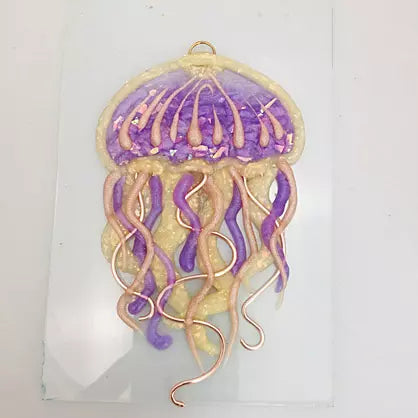
Squirt Amethyst Liquid Sculpey® (LS) into the body area.

Sprinkle iridescent glitter flakes onto the Amethyst LS. Submerge the glitter flakes into the LS with the tip of a tool. Using tweezers will help you place the glitter flakes accurately. Use paper towel to clean your tools.

Place more Amethyst LS over the top of the glitter flakes.

Bake the jellyfish on the glass following the baking instructions for Sculpey Premo™. Remove the glass carefully from the oven using hand protection. While the glass is still hot, drip designs on the jellyfish body with Rose Gold LS.
While the glass is still hot, drip more tentacles in Rose Gold and Amethyst. As long as the glass is hot, the LS will be more manageable because it will partially cure as soon as it touches the hot glass. That way it will not spread but remain in the tentacle shapes that you want. This photo was taken while the glass is still on the heated baking pan.
While the glass is still hot, drip more tentacles in Rose Gold and Amethyst. As long as the glass is hot, the LS will be more manageable because it will partially cure as soon as it touches the hot glass. That way it will not spread but remain in the tentacle shapes that you want. This photo was taken while the glass is still on the heated baking pan.

Bake again following the baking instructions for Sculpey Premo™. Allow the piece to cool completely before peeling it carefully off of the glass.

- Choosing a selection results in a full page refresh.
- Opens in a new window.

