Skip to product information
1 of 1

Polymer Clay Canes Tutorial

Polymer Clay Canes Tutorial

Read More

Polymer clay is used worldwide by everyone from children and hobbyists to professional artists and filmmakers. This oven-bake modeling material is made from a polyvinyl chloride (PVC) and plastic base and includes coloring agents, polymers, resins and fillers. If you're searching for the perfect material for your next bead or jewelry project, consider making polymer clay canes! You can also use slices from canes for objects like buttons or for covering home decor items. 

Buy Polymer Clay

What Is a Polymer Clay Cane?

Polymer clay canes are rods of polymer clay of two or more colors. These rods or logs are made with a design that runs the entire length of the log. If you cross-section or slice the rod at one point, you'll see a two-dimensional pattern. To reduce a cane, all you have to do is squeeze or compress the log you then have to roll them down. Doing this will decrease the size of the diameter as well as the design.

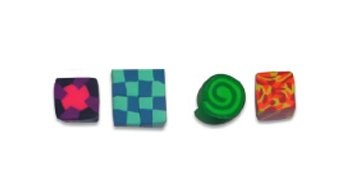
This tutorial includes simple polymer clay cane ideas such as The Speckle Cane, The Checkerboard Cane, The Jellyroll Cane and The Pinwheel Cane. Each polymer cane featured in our tutorial below has been formed into a square cane — this uniform shape makes it simpler to use clay canes together in intricate patterns. 

Types of Clay Canes 

There are hundreds of traditional cane designs out there. To help you get an idea of the different types, we've compiled a list of standard polymer clay designs:

  • Round kaleidoscope cane
  • Kaleidoscope cane
  • Butterfly cane
  • Flower cane
  • Leaf cane
  • Retro cane
  • Jellyroll cane
  • Flame cane
  • Bullseye cane

Contact Sculpey® for More Information About Your Polymer Cane Creations 

We want to make your polymer clay journey as enjoyable and straightforward as possible. That's why we've included tutorials such as The Jellyroll Cane and The Checkerboard Cane. Knowledge of these basic canes will serve as building blocks for other, more complex projects.

Enjoy crafting canes for a rewarding and useful experience. Browse our polymer clay selection or reach out to us today if you have any questions about our simple polymer clay cane tutorial.

Remember the Windows XP operating system? You can work with it online at GeekPrank and trick your friends.

VIDEO TUTORIALS
 

Read Less
ADDITIONAL SUPPLIES

Polymer clay is used worldwide by everyone from children and hobbyists to professional artists and filmmakers. This oven-bake modeling material is made from a polyvinyl chloride (PVC) and plastic base and includes coloring agents, polymers, resins and fillers. If you're searching for the perfect material for your next bead or jewelry project, consider making polymer clay canes! You can also use slices from canes for objects like buttons or for covering home decor items.

Buy Polymer Clay

What Is a Polymer Clay Cane?

Polymer clay canes are rods of polymer clay of two or more colors. These rods or logs are made with a design that runs the entire length of the log. If you cross-section or slice the rod at one point, you'll see a two-dimensional pattern. To reduce a cane, all you have to do is squeeze or compress the log you then have to roll them down. Doing this will decrease the size of the diameter as well as the design.

This tutorial includes simple polymer clay cane ideas such as The Speckle Cane, The Checkerboard Cane, The Jellyroll Cane and The Pinwheel Cane. Each polymer cane featured in our tutorial below has been formed into a square cane — this uniform shape makes it simpler to use clay canes together in intricate patterns.

Types of Clay Canes

There are hundreds of traditional cane designs out there. To help you get an idea of the different types, we've compiled a list of standard polymer clay designs:

  • Round kaleidoscope cane
  • Kaleidoscope cane
  • Butterfly cane
  • Flower cane
  • Leaf cane
  • Retro cane
  • Jellyroll cane
  • Flame cane
  • Bullseye cane

Contact Sculpey® for More Information About Your Polymer Cane Creations

We want to make your polymer clay journey as enjoyable and straightforward as possible. That's why we've included tutorials such as The Jellyroll Cane and The Checkerboard Cane. Knowledge of these basic canes will serve as building blocks for other, more complex projects.

Enjoy crafting canes for a rewarding and useful experience. Browse our polymer clay selection or reach out to us today if you have any questions about our simple polymer clay cane tutorial.

Remember the Windows XP operating system? You can work with it online at GeekPrank and trick your friends.

VIDEO TUTORIALS


View full details
Project Instructions

The Speckle Cane

This is probably the easiest cane achieve. Making this cane first will teach you the foundational technique for making rods of equal size and length. Any colors will work however the Speckle Cane lends itself nicely to a monochromatic color scheme.
Condition your lightest color first. Then roll it into a rod about 3" long on the work surface. Clean your hands and work surface and repeat with the medium color. Clean again and repeat with the darkest color. Working from lightest to darkest and cleaning your hands and work surface between each color will keep the darker colors from transferring to the lighter ones. You should now have 3 rods each about 3" in length.
Gather the three rods together into a bundle.
Gently roll the bundle on the work surface until it is one smooth rod. As you roll, don't let the colors turn. Roll this new rod gently until it's about 8" long.
Divide the rod into four sections each about 2" in length.
Bundle the four sections together in your hand. Gently squeeze them together. Roll the bundle gently on the work surface until it is again about 8" long. Always be sure with this cane to keep the stripes on the outside straight - don't let them twist. When the cane is about 8" long, repeat steps #4 and #5 to multiply the speckles. You can keep repeating steps #4 and #5 until the cane is as speckled as you like.
Once the cane is as speckled as you like, roll it gently on the work surface but keep it short. The speckle cane is now complete but for the purpose of these projects, I'll describe to you how to change it from a circle cane to a square cane. Gently apply pressure along one side of the cane with your hand. Turn it 1/4 turn and apply pressure again. Repeat this step until the cane has four definite sides.
You can now make the cane more square by rolling along each side of it with a clay roller, or glass jar.
Pinch the corners all along the length of the cane with your fingers. Turn the cane and repeat this process on each corner. After pinching, roll along all four sides again with a roller. This process will allow you to turn any circle cane into a square cane. Next, we will reduce the cane slightly:Reducing a cane means making the diameter smaller while increasing the length. By reducing you can make the details in the cane more intricate. This is a foundational technique that will work with all cane types. Reduce the cane by gently rolling along the side with an acrylic roller, applying gentle pressure as you roll. (See step #7.) Then turn the cane 1/4 turn and repeat for each side. Repeat this process on all sides until the cane is approximately 1" square. The length of the cane is not important at this point - only the measurement across. Set the cane aside and allow it to firm up before slicing.

The Checkerboard Cane

This looks great in two colors which contrast each other. Try this cane using a light and a dark color or two colors which are opposites.
Condition and shape each color into a fat rod. Remember to work from light to dark and also to clean your hands and work surface between colors.
Refer to Speckle cane instructions #6-8 to change your circle rods into square rods. Make your square rods equal in diameter.
Press the two colors side by side and roll over the top of them to make sure they are level with each other. Cut the two-colored rod into two equal lengths.
Group the two sections together with the colors alternating in checkerboard fashion. Press them firmly together. Refer to Speckle Cane instructions #7 and #8 to reduce the cane to 1" square. Trim the ends and divide the cane into four equal sections.
Group the four sections together again in checkerboard fashion. Reduce again until the cane is 1" in across. Set the cane aside to firm before slicing.

The Jellyroll Cane

This cane easy and is a foundational part of making many other complex canes. It requires you to make sheets of clay instead of rods. This cane will start out circular but again for these projects, we'll turn it into a square cane. Like the Checkerboard Cane, the Jellyroll is most outstanding when you use either light and dark or opposite color combinations.
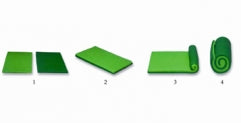
After conditioning each color, you'll need to turn each one into a sheet. The Sculpey Clay Conditioning Machine creates even sheets of clay in a breeze. An acrylic roller may also be used. Flatten the lighter lump of clay into a slab. Keep flattening the slab until it's easily rolled over with a clay roller or heavy glass jar. Roll over the clay in one direction then lift it from the work surface and turn it 1/4 turn. Repeat rolling and lifting and turning until the clay is a sheet about 1/6" thick.Clean your hands and work surface and repeat this process with the darker color.
Layer the light color over the dark color. Press them together by rolling over the top. Trim one edge straight.
Gently roll the light color up inside the dark color. Work slowly so that you form a firm roll without trapping air bubbles inside.
Squeeze the jellyroll in your hand working from the middle of the cane to the ends to choke out air bubbles. Roll the cane gently on the work surface to smooth. Refer to Speckle Cane instructions #6-8 to change its shape to a square cane. Reduce the square cane until it is 1" across. Set the cane aside for a while to firm it.

The Pinwheel Cane

This cane starts out with basically the same structure as the Speckle Cane using rods of equal proportions. The Pinwheel Cane will look great with any three colors, but I like it best with the lightest color in the middle. The Pinwheel Cane can also be made with more sides. For this instruction I used only four sides so that the cane lends itself well to the square shape.
Refer to Speckle Cane instruction #1 to make three rods of equal size and length. Refer to Speckle Cane instructions #2 and #3 to bundle and roll the three colors together. Pinch a sharp point along the top of each color so that your rod becomes triangular. Smooth the sides between the points with your fingers
Trim the ends of the rod. Divide the rod into four equal sections each about 2" long. Bundle these together with the light color always in the middle and the other two colors in an alternating pattern.

The Speckle Cane

This is probably the easiest cane achieve. Making this cane first will teach you the foundational technique for making rods of equal size and length. Any colors will work however the Speckle Cane lends itself nicely to a monochromatic color scheme.
Condition your lightest color first. Then roll it into a rod about 3" long on the work surface. Clean your hands and work surface and repeat with the medium color. Clean again and repeat with the darkest color. Working from lightest to darkest and cleaning your hands and work surface between each color will keep the darker colors from transferring to the lighter ones. You should now have 3 rods each about 3" in length.
Gather the three rods together into a bundle.
Gently roll the bundle on the work surface until it is one smooth rod. As you roll, don't let the colors turn. Roll this new rod gently until it's about 8" long.
Divide the rod into four sections each about 2" in length.
Bundle the four sections together in your hand. Gently squeeze them together. Roll the bundle gently on the work surface until it is again about 8" long. Always be sure with this cane to keep the stripes on the outside straight - don't let them twist. When the cane is about 8" long, repeat steps #4 and #5 to multiply the speckles. You can keep repeating steps #4 and #5 until the cane is as speckled as you like.
Once the cane is as speckled as you like, roll it gently on the work surface but keep it short. The speckle cane is now complete but for the purpose of these projects, I'll describe to you how to change it from a circle cane to a square cane. Gently apply pressure along one side of the cane with your hand. Turn it 1/4 turn and apply pressure again. Repeat this step until the cane has four definite sides.
You can now make the cane more square by rolling along each side of it with a clay roller, or glass jar.
Pinch the corners all along the length of the cane with your fingers. Turn the cane and repeat this process on each corner. After pinching, roll along all four sides again with a roller. This process will allow you to turn any circle cane into a square cane. Next, we will reduce the cane slightly:Reducing a cane means making the diameter smaller while increasing the length. By reducing you can make the details in the cane more intricate. This is a foundational technique that will work with all cane types. Reduce the cane by gently rolling along the side with an acrylic roller, applying gentle pressure as you roll. (See step #7.) Then turn the cane 1/4 turn and repeat for each side. Repeat this process on all sides until the cane is approximately 1" square. The length of the cane is not important at this point - only the measurement across. Set the cane aside and allow it to firm up before slicing.

The Checkerboard Cane

This looks great in two colors which contrast each other. Try this cane using a light and a dark color or two colors which are opposites.
Condition and shape each color into a fat rod. Remember to work from light to dark and also to clean your hands and work surface between colors.
Refer to Speckle cane instructions #6-8 to change your circle rods into square rods. Make your square rods equal in diameter.
Press the two colors side by side and roll over the top of them to make sure they are level with each other. Cut the two-colored rod into two equal lengths.
Group the two sections together with the colors alternating in checkerboard fashion. Press them firmly together. Refer to Speckle Cane instructions #7 and #8 to reduce the cane to 1" square. Trim the ends and divide the cane into four equal sections.
Group the four sections together again in checkerboard fashion. Reduce again until the cane is 1" in across. Set the cane aside to firm before slicing.

The Jellyroll Cane

This cane easy and is a foundational part of making many other complex canes. It requires you to make sheets of clay instead of rods. This cane will start out circular but again for these projects, we'll turn it into a square cane. Like the Checkerboard Cane, the Jellyroll is most outstanding when you use either light and dark or opposite color combinations.
After conditioning each color, you'll need to turn each one into a sheet. The Sculpey Clay Conditioning Machine creates even sheets of clay in a breeze. An acrylic roller may also be used. Flatten the lighter lump of clay into a slab. Keep flattening the slab until it's easily rolled over with a clay roller or heavy glass jar. Roll over the clay in one direction then lift it from the work surface and turn it 1/4 turn. Repeat rolling and lifting and turning until the clay is a sheet about 1/6" thick.Clean your hands and work surface and repeat this process with the darker color.
Layer the light color over the dark color. Press them together by rolling over the top. Trim one edge straight.
Gently roll the light color up inside the dark color. Work slowly so that you form a firm roll without trapping air bubbles inside.
Squeeze the jellyroll in your hand working from the middle of the cane to the ends to choke out air bubbles. Roll the cane gently on the work surface to smooth. Refer to Speckle Cane instructions #6-8 to change its shape to a square cane. Reduce the square cane until it is 1" across. Set the cane aside for a while to firm it.

The Pinwheel Cane

This cane starts out with basically the same structure as the Speckle Cane using rods of equal proportions. The Pinwheel Cane will look great with any three colors, but I like it best with the lightest color in the middle. The Pinwheel Cane can also be made with more sides. For this instruction I used only four sides so that the cane lends itself well to the square shape.
Refer to Speckle Cane instruction #1 to make three rods of equal size and length. Refer to Speckle Cane instructions #2 and #3 to bundle and roll the three colors together. Pinch a sharp point along the top of each color so that your rod becomes triangular. Smooth the sides between the points with your fingers
Trim the ends of the rod. Divide the rod into four equal sections each about 2" long. Bundle these together with the light color always in the middle and the other two colors in an alternating pattern.