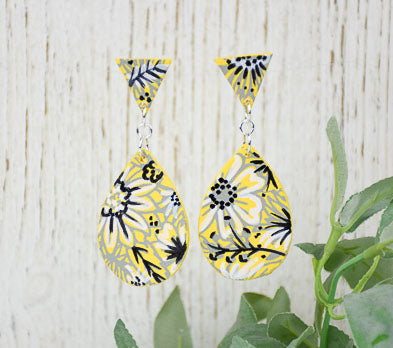
Sculpey Soufflé™ Color of the Year Earrings
Sculpey Soufflé™ Color of the Year Earrings
Designed by Amy Koranek
Read More
Read Less
Sculpey Soufflé™ Canary dances happily together with grey, white and black paints and markers in playful floral patterns.
COMPLETION TIME: 60 Minutes to make, bake, and assembleADDITIONAL SUPPLIES
- Pasta machine - optional,
- Water basin large enough for the screen,
- Gray acrylic paint,
- White paint marker,
- Black paint marker
- 8 mm Bright silver tone jump rings (4)
- 6 mm Bright silver tone jump rings (2)
- Silver tone posts with back (2)
- Silicone glue
- Flat nose pliers

Project Instructions
- Getting Started:
Start with clean hands, unwrap and knead clay until soft and smooth, or condition by running clay though a Pasta Machine. We recommend using a designated machine for clay purposes only. When working with multiple colors, clean hands with soap and water or baby wipes (we have found that baby wipes work best) before switching colors. Shape clay, pressing pieces firmly together. Wash hands after use.
- Baking:
Sheet Canary Soufflé through the pasta machine on the thickest setting or use the Acrylic Roller to make a 1/8” thick sheet.

Lay the Floral pattern screen shiny side down on top of the clay. Burnish it down smoothly with your fingertips.

Squirt a bead of the gray paint across the short end of the screen.

Drag the squeegee firmly across the screen dragging the paint evenly.

Carefully pull the screen back from the clay. Deposit the screen in the water basin so that the paint can soak off or wash immediately with soap and water. Wash the squeegee as well.

Allow the paint to dry completely on the clay.

Cut out teardrop shapes using the Jewelry Design Templates and the Blade Tool in the 5-in-1. Use the Clay Blade to cut out around the outside of the triangle template shapes.

Position the shapes as you want them to go together. Poke holes using the Needle Tool in the 5-in-1. Bake the pieces and allow them to cool completely when done.

Use the white paint marker to doodle highlights in the design.

Use the black paint marker to doodle highlights next.

Here’s a layout of how the earrings will be assembled showing the position of the jump rings and the ear posts.

Assemble the earrings using flat nose pliers to open and close the jump rings. Glue the posts to the back with silicone glue.

Finished earrings!

- Choosing a selection results in a full page refresh.
- Opens in a new window.

