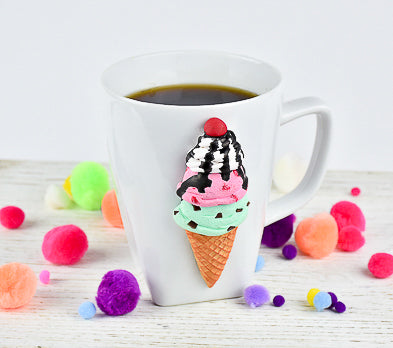
Sculpey Premo™ Mint Chocolate Chip Mug
Sculpey Premo™ Mint Chocolate Chip Mug
Designed by Phoebe Doehring
Read More
Read Less
How fun is this mug created with Premo Mint and a clever homemade texture tool.
TIME TO COMPLETION: 90 minutes
ADDITIONAL SUPPLIES
- Ceramic Mug
- Toothbrush
- Acrylic Paint: Burnt Sienna
- Paintbrush
- Cornstarch
- Toothpick
- Super Glue

Project Instructions
- Getting Started:
Start with clean hands, unwrap and knead clay until soft and smooth, or condition by running clay though a Pasta Machine. We recommend using a designated machine for clay purposes only. When working with multiple colors, clean hands with soap and water or baby wipes (we have found that baby wipes work best) before switching colors. Shape clay, pressing pieces firmly together. Wash hands after use.
- Baking:
Condition 1/2 block of Ecru clay. Run through the clay machine on the #1 setting. Fold in half and cut out a square that is approx.. 2” x 2”. Use your 5 in 1 tool and create vertical lines 1/8” apart. Create horizontal lines 1/8 apart. This is going to be your waffle cone texture sheet after it is baked. Set onto your baking sheet or tile.
Condition a 1” ball of Burnt Umber clay and run it through the clay machine on the #3 setting. Lay this thin sheet on your baking sheet with the waffle texture sheet.
Bake these according to package directions and allow to cool.
Condition a 1” ball of Burnt Umber clay and run it through the clay machine on the #3 setting. Lay this thin sheet on your baking sheet with the waffle texture sheet.
Bake these according to package directions and allow to cool.
Cut thin slices from the Burnt Umber baked sheet. Cut little different sized pieces away from the slices to make chocolate chips. Set aside for now.

Roll a 3/4" sized ball of Ecru clay. Roll into a cone shape and flatten into a cone that is approximately 1” at the top and 1-1/2” long. It should only be about 1/8” thick.
Roll a 1-1/2” ball of Ecru. Flatten and run it through the clay machine on the #2 setting.
Spread a bit of cornstarch on the sheet making sure you cover the whole thing. This is to prevent your waffle texture sheet from sticking. Press your texture sheet down on top of the clay pressing firmly. Remove sheet.

Drape the waffle texture sheet over your cone shape. Trim away excess. Press so there are no air bubbles. Set aside for now.

Combine equal nickel sized amounts of Pomegranate and White clay to make Pink. Roll a 3/4" ball of Pink.
Roll a tiny thin snake of Pomegranate. Cut away small pieces. Press these little pieces randomly all around your Pink ball. Roll in your hands. Set aside.
Roll a 3/4” sized ball of Mint clay. Shape this into a flattened ice cream scoop shape. Use your thumbnail to create ice cream scoop indents in the clay. Push some chocolate chips that you cut out into the clay randomly.

Press this scoop on to the top of your waffle cone.
Do the same with your Pink (strawberry) ball of clay. Press this on top of the mint chip scoop. Use a toothbrush and press some texture into both scoops for added interest.
Do the same with your Pink (strawberry) ball of clay. Press this on top of the mint chip scoop. Use a toothbrush and press some texture into both scoops for added interest.

Condition a 1/4” block of White clay well. Roll a snake to fit into your clay extruder. Use the extruder disc that has 4 quadrants. Press out a length of extruded White clay.

Create the whipped cream by spiraling the White clay around a few times to fit on top of the strawberry scoop. Trim away excess. Press on to fit.
Roll a ball of Pomegranate clay 1/4” in size. Press this on top of the whipped cream for a cherry.
Roll a ball of Pomegranate clay 1/4” in size. Press this on top of the whipped cream for a cherry.

Press your ice cream cone creation onto the side of your mug now making sure it lays flat on all sides and top.

Use a toothpick to mix together equal amounts of Black and Gold Liquid Sculpey to make some hot fudge sauce.
Use the toothpick to drizzle some of the mix down the whip cream to look like hot fudge.
Bake according to the directions in Step 1 above. Allow to cool completely.
Use the toothpick to drizzle some of the mix down the whip cream to look like hot fudge.
Bake according to the directions in Step 1 above. Allow to cool completely.

Use a paintbrush to dry-brush some Burnt Sienna paint on the waffle cone to give it depth. Allow the paint to dry.
Gently pop the ice cream cone off from the mug. Re-secure using super glue. Allow to dry.
Like all fine ceramics, always gently handwash your mug-do not put in the dishwasher.
Gently pop the ice cream cone off from the mug. Re-secure using super glue. Allow to dry.
Like all fine ceramics, always gently handwash your mug-do not put in the dishwasher.


