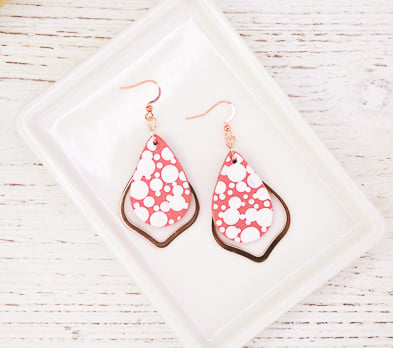
Sculpey Premo™ + Sculpey Souffle™ Paint Dots Earrings
Sculpey Premo™ + Sculpey Souffle™ Paint Dots Earrings
Designed by Amy Koranek
Read More
Read Less
The Sculpey Premo™ + Sculpey Souffle™ Multi Pack of colors is a wonderful way to create your own custom colors! Add some clever paint dots created with the Sculpey Tools™ Dual End Detail Tools to create a custom abstract effect!
COMPLETION TIME:
45 Minutes to make, bake, and assemble
ADDITIONAL SUPPLIES
- Glossy white acrylic paint
- Gold tone ear wires (2)
- 8 mm Gold tone jump rings (2)
- 4 mm Gold tone jump rings (2)
- Pear shaped connectors - Gold tone (2)
- Flat nose pliers

Project Instructions
- Getting Started:
Start with clean hands, unwrap and knead clay until soft and smooth, or condition by running clay though a Pasta Machine. We recommend using a designated machine for clay purposes only. When working with multiple colors, clean hands with soap and water or baby wipes (we have found that baby wipes work best) before switching colors. Shape clay, pressing pieces firmly together. Wash hands after use.
- Baking:
First, we will make a coral color from the colors in the Multi Pack. Each bar in the Multi Pack is a 1-ounce size and the amounts given here are based on this smaller bar size. You will need:
1/4 bar of Pumpkin
1/4 bar of Rose Gold Glitter
1/16 bar of Igloo
1/32 bar of Cherry Pie
1/32 bar of Turnip
Mix these amounts completely and then roll a flat sheet 1/8” thick with the Acrylic Clay Roller. Make sure the size of the sheet of clay will accommodate two of the 1-1/2” tear drop shapes.
1/4 bar of Pumpkin
1/4 bar of Rose Gold Glitter
1/16 bar of Igloo
1/32 bar of Cherry Pie
1/32 bar of Turnip
Mix these amounts completely and then roll a flat sheet 1/8” thick with the Acrylic Clay Roller. Make sure the size of the sheet of clay will accommodate two of the 1-1/2” tear drop shapes.

Using the 6 mm (medium) Ball Tool, dip the tip of the ball into the white acrylic paint and touch the paint to the clay. Repeat dipping the ball in the paint and to the clay to create a random pattern.

Add larger dots with the 12 mm (large) Ball Tool.

Finally, add small dots with the 2 mm (small) Ball Tool. Allow the paint to dry completely.

Cut out two teardrops using the 1-1/2” cutter.

Position the clay teardrops each one on top of the pear-shaped connector. Poke a hole in the top of each teardrop with the Needle Tool making sure the hole lines up with the hole in the connector.
Bake the clay pieces following the baking instructions in Step 1 above. Allow them to cool completely after baking.
Bake the clay pieces following the baking instructions in Step 1 above. Allow them to cool completely after baking.

Here is a layout of how the earrings will be assembled.

Use flat nose pliers to connect the clay pieces to the connectors with the 8 mm jump rings.
Use flat nose pliers to connect the 8 mm jump rings to 4 mm jump rings and connect them also to the ear wires.

Here’s a look at the back of the earrings as well.

- Choosing a selection results in a full page refresh.
- Opens in a new window.

