Sculpey III® Tie Dye Hair Clips
Sculpey III® Tie Dye Hair Clips
Designed by Amy Koranek
Read More
Read Less
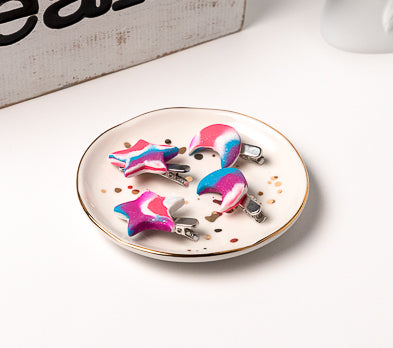
Spend a fun afternoon with your besties creating some unique sparkling hair clips featuring a faux tie dye pattern.
TIME TO COMPLETION: 45 minutes
ADDITIONAL SUPPLIES
- Hair clips
- Silicone glue

Project Instructions
Getting Started:
Please make sure your work area is covered and you are not working on an unprotected surface. We recommend working on the Sculpey® Oven Safe Work Mat, wax paper, metal baking sheet, or disposable foil. Uncured clay may damage unprotected furniture or finished surfaces. Be sure to cover your crafting area appropriately.
Start with clean hands, unwrap and knead clay until soft and smooth, or condition by running clay though a Pasta Machine. We recommend using a designated machine for clay purposes only. When working with multiple colors, clean hands with soap and water or baby wipes (we have found that baby wipes work best) before switching colors. Shape clay, pressing pieces firmly together. Wash hands after use.
Baking:
Begin by preheating oven to 275 °F (130 °C). After you are done creating; for best results bake clay on an oven-proof surface such metal, aluminum foil, an index card or the Sculpey® Oven Safe Work Mat at 275°F (130 °C) for 15 minutes per ¼" (6 mm) thickness according to package directions. Oven safe glass or ceramic surfaces are also acceptable for baking; however please note that the baking times may take longer as the glass or ceramic surfaces take longer to heat up. For best baking results, use an oven thermometer. DO NOT USE MICROWAVE OVEN. DO NOT EXCEED THE ABOVE TEMPERATURE OR RECOMMENDED BAKING TIME. BAKING SHOULD BE DONE BY AN ADULT.
From 1/4 bar of White Sculpey III®, make two thick logs. From 1/8 bar of each Glitter Pink, Glitter Blue, and Glitter Violet, make one thick log. Place the logs next to each other sides touching as shown.

Bundle the logs and squish them together in the palm of your hand to make a thick bundle.

Gently roll and twist the bundle to make a thick log.

Roll the log flat to form a thick striped slab, about 3/16” thick.

Use your fingertips to drag the colors into each other making a tie dye pattern. You can drag as much or as little as you like. Dragging in different directions will make a more random pattern.

Use the 1” circle cutter to cut out a circle from the slab of tie dye clay. This will be the beginning of a star.

Use the blunt pointed tool to push five indents around the edges of the circle. This will give you little places to pinch the clay into points.

Pinch each area between the indents out with your thumb and fingertip.

Repeat until you have five points pinched out equally.

Test how the star will look by positioning it on top of your hair clip.
Repeat Steps 7-10 to make as many stars as you would like.

For a moon shape, cut out a 1” circle. Then use the same cutter to step over and turn the moon into a crescent by removing part of the circle.

Bake the stars and the moons following the baking instructions for Sculpey III®. When the clay pieces are completely cool, glue them to the hair pins with silicone glue. Allow the glue to dry completely before handling.


