Skip to product information
1 of 1

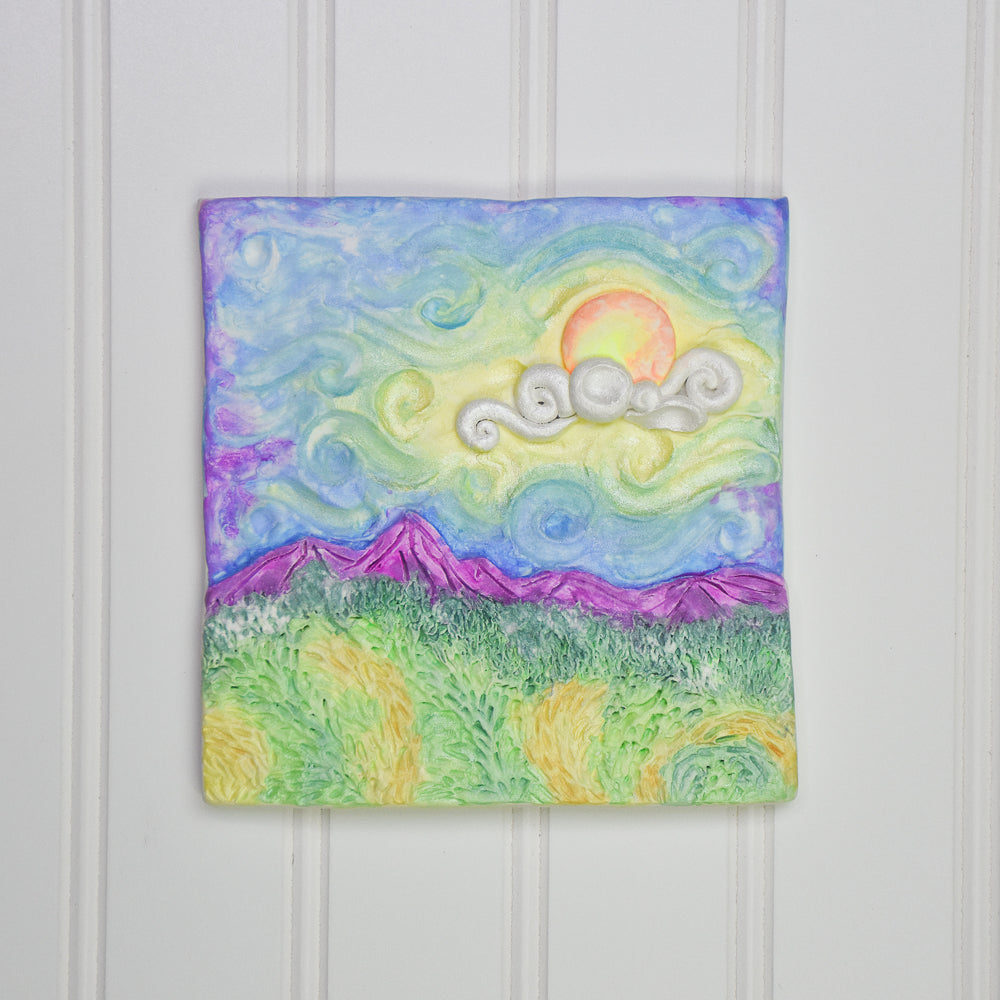
Sculpey® Air Dry Clay and Sakura Koi Watercolors Relief Wall Plaque

Sculpey® Air Dry Clay and Sakura Koi Watercolors Relief Wall Plaque

Designed by Amy Koranek
Read More
In this tutorial we will explore the use of watercolors - both flat and pearl colors - on Air Dry Clay. You may apply watercolors to the Air Dry Clay before the clay is completely dry or after it is completely dry. You do not have to be proficient in watercolor for this project! TIME TO COMPLETION: 90 Minutes plus drying time - recommended that you let the wall hanging dry overnight before painting.
Read Less
ADDITIONAL SUPPLIES
  • Koi Watercolor Field Sketch Kit 24 Colors
  • Cardstock template in the size of your choosing - My project is 5.5” x 5.5”
  • 1” Small circle cutter - or you can cut a hole in the back for the hanger with the Needle Tool
  • 4” Wire
  • Side cutters or heavy scissors
  • Water basin
  • Paper towels
  • Plastic bag for storing open Air Dry Clay for later use
  • Large soft bristle paint brush
  • Wire rack for drying
View full details
Project Instructions

Step 1

Getting Started:

Surface: For the best results in sculpting and crafting with air dry clay, plan to work with a smooth, well-cleaned, non-porous surface.

Amount: Because the clay is made to air-dry, try to open only what you need at the time and leave the rest still wrapped or sealed and stored. Pinch or cut off the amount you need and take more out as you go, even for larger projects.

Working: Knead your clay before you begin shaping it for your creations. Our polymer clay is already soft and pliable, but warming the clay with your hands is a good practice to spread the substance, condition the material and get a feel for what you’re working with.

Shaping: You can use a combination of your hands, crafting tools and multimedia materials to shape your clay into the design you desire, create unique patterns and textures and incorporate mixed media elements. Remember: you can create anything you can imagine! Just make sure the finished product is exactly what you want before allowing it to dry.

Drying: Lay or stand your air dry clay projects on a nonporous surface with a clean and smooth finish in an area with low humidity. Let the projects remain untouched and undisturbed for about 24 hours to ensure complete hardening.

Step 2

We will begin by creating a hanger for the little wall plaque. Start with a 4” piece of wire and bend it over the thickest part of the Ball/Blunt End Tool. This will create a
nice round loop. Then with the wire still on the tool, grasp both tails of the
wire and twist them tightly to the tool.

892-3

Carefully remove the twisted loop from the tool. You may trim the ends with wire cutters or heavy scissors or bend them at the tips to remove the sharp points (refer to Step 6 photo).

Step 4

Since this project may possibly go through several trimmings based on how much the clay stretches as we add details to it, I find it helpful to use a pre-sized paper template for trimming. My template is a piece of cardstock that is 5.5” x 5.5”.

Sheet 1/4 bar of the 2.2# clay block to 1/8”-3/16” thick. Sheet the clay so that you can achieve at least two of the template square shapes from this amount. Place the clay on top of the Oven-Safe Work Mat so that it does not need to be moved again.

Use the template to cut out the first square using the Knife Shaped Tool. Smooth cut edges with fingertips.

Step 5

Cut out a small hole from near the top center of the clay to provide a position for the hanger. Cut the hole with a small circle cutter or the Needle Tool. If your plaque will be displayed on a small easel, it’s possible that you won’t need a hanger.

Step 6

Carefully place the wire hanger with the loop in the center of the hole and the wire tail on top of the clay.

Step 7

Cut out another template sized piece of clay and place it over the first sheet sandwiching the hanger in place. Roll over both pieces with the Acrylic Clay Roller to seal them together.

Step 8

Use the template and the Knife Tool to once again trim the outer edges to the finished size. Smooth cut edges with fingertips.

Step 9

Now we will build up the bas relief areas of the plaque. From another sheet of the rolled clay, make a horizontal line with a few distant mountain peaks in it. This sheet may be thinner than the original base sheets.

Use the template to square the bottom of this sheet. Place it over the bottom of the plaque. If the plaque is getting dry, you can always add a smear of water between layers to help them adhere to each other.

Smooth the cut skyline with your fingertips.

Place all but a small amount of the Air Dry Clay into an air tight plastic bag for future projects. Keep only enough out to add small details to the plaque.

Step 10

Add a cabochon style circle of clay to the top right area of the sky for a sun. Add water in thin smears as necessary to keep things sticking together.

Step 11

Draw a more close horizon line in the foreground with the Needle Tool under the mountain range.

Step 12

Now we will work on making a swirly cloudy sky. Dip the Ball End Tool in water and drag it through the sky areas in swirling motions. When the Ball Tool picks up excess wet clay, wipe it away with paper towel or dip it into the water basin to clean it.

Starting with clean strokes will make the best swirls.

Take your time and enjoy the process of adding details.

You can always practice on a scrap of wet clay to gain more confidence.

Step 13

Here’s a look at the swirly sky. It may seem busy for now, but the added textures will help accumulate watercolors later when applied.

Step 14

Add swirly clouds of more wet clay to the area around the sun. Apply water as needed to the base clay so that your clouds stick.

Step 15

As we add textures, feel free to dip your tools in water so the tools move more cleanly across the clay that is starting to dry. Clean tools frequently with more water or paper towel.

Next, use the tip of the Needle Tool to drag some downward moving lines from the tips of the mountains to their bases.

Use the tip of the Knife Tool to add little tufts of texture to the area just below the mountains. Keep these strokes very short because they are in the distance and only imply texture.

Step 16

In the foreground area, use the Blunt Point Tool to add swatches of moving textured areas as shown.

Step 17

Fill in the areas in between the swatches you just made with more thin textures using the tip of the Needle Tool.

When you are happy with the amount of textures applied to your little plaque, allow it to dry on the Work mat until at least the top surface is dry to the touch.

Based on your own experience level with Air Dry clay and with watercolors, you may choose to allow the piece to dry completely overnight, or you may choose to add paint while the piece is barely dry to the touch. For my skill level, I wanted to
have the most control possible over the clay and the paint, so I let my piece
dry overnight.

Once the piece has dried enough that it can be lifted, you can also place it on a wire rack to help air circulate and dry the underneath side more evenly.

Step 18

To begin painting, use
the included Refillable Water Brush to paint the clouds in the sky with #251
Silver. This will make sure that the clouds stay white as you paint around
them.

Step 19

Please feel free to experiment for yourself with which techniques work best for you. You may prefer to add watercolors to your project in a very dry manner, using more paint to produce deeper shades. Or you may prefer to use very wet paints, even adding water to the surface of the dried clay to help the paints flow. I used a very wet technique so that my paint would pool in the lower areas and could be wiped away from raised areas with either a dry brush or even paper towel.

To begin, I added a smear of water to the entire sky area (excluding the sun and clouds) with a large soft bristle brush.

Step 20

From here on, I only used the Refillable Water Brush included in the Field Kit. I loaded the removable barrel with clean water and replaced it on the brush tip. As I
worked, I made sure to clean the bristles of the brush tip in a water basin of
clean water between color changes. However, I did not have to reload the barrel
for the entire painting.

Note: As needed you can squeeze water from the plastic barrel into the bristles as you are painting to add more water or to lighten paint.

Then I proceeded to add wet paint in #286 Pearl Light Blue (working from lighter to darker) with the Refillable Water Brush included in the Field Kit.

Step 21

I removed areas of paint with a paper towel to show the textures better. I also stayed away from the cloud area with the blue paint.

Step 22

Then I added a very wet mixture of #287 Pearl Blue around the edges.

Note: at some point, if enough water is added, the Air Dry Clay may become wet enough to alter your original textures. Please pay close attention and back off from excess water as needed.

Step 23

Next I added a tiny bit of #261 Fluorescent Yellow to the sun and toned it down a bit with #281 Pearl Yellow.

I also painted the sky around the sun in #281 Pearl Yellow in a wet fashion that allowed it to blend with the clouds on the edges creating the greenish blend.

Step 24

I added some highlights of #262 Fluorescent Orange and #282 Pearl Orange to the sun itself, blending the colors with the water brush included in the kit. I also blended more #281 Pearl Yellow around the area where the sunshine meets the clouds.

Add darker areas toward the outside border of the sky with #265 Fluorescent Blue.

Step 25

With a wet brush apply #269 Fluorescent Violet to the mountain range and the edges of the clouds.
Allow the violet mountain color to bleed into the top of the stippled area if
you wish.

Step 26

Next paint #281 Pearl Yellow into the foreground in the thin textured areas. Paint #289 Pearl Green Pale into the thicker textured areas. Note: in this photo I transferred the painting onto a wire rack to encourage more overall air flow around the drying piece.

Step 27

Build deeper colors in the grass with each #266 Fluorescent Green, #291 Pearl Green Deep, #290 Pearl Green, and #252 Light Gold.

Check the painting. If there are areas that are too dark, you can carefully lighten them by applying more water to drag away some of the color. Or you can carefully wipe excess away with paper towel.

Allow the painting to dry completely before handling.