Skip to product information
1 of 1

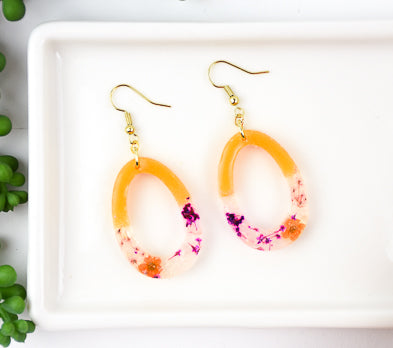
Liquid Sculpey® Dried Flower Earrings

Liquid Sculpey® Dried Flower Earrings

Designed by Amy Koranek
Read More

You can add dried flowers or other tiny treasures to Liquid Sculpey® in the Oven Safe Jewelry Mold to make wearable art. Every single piece will be as unique as the memory that they preserve. If you use organic material such as flowers and pieces of flowers, be sure they are completely dry before beginning the project. The flowers I’m using here have been professionally dried and are the style that are used in fingernail art. Always test your included materials with a small amount of Liquid Sculpey® before committing to the finished project.


Designer’s Note: Before using Clear LS, it is really important that the product is stirred completely. You will find that there is sediment in the bottom of the bottle. This sediment is completely natural. However, it should be mixed back into the product completely before using it so that the Clear LS performs well. You will find that Clear LS will require stirring each and every time it is used. For this reason, I pour the contents of Clear LS out into a small glass dish and I stir it with a small spoon before every use. Once I have poured it into the glass dish, I leave it there and cover it lightly so that it remains free of dust. I do not put it back into the original bottle.

Read Less
ADDITIONAL SUPPLIES
  • Paper towel
  • Small glass dish - Optional
  • Small piece of kitchen wrap - Optional
  • Small spoon - Optional
  • Sharp scissors
  • Dried flowers
  • Heat gun
  • 8 mm Gold tone jump rings (2)
  • 4 mm Gold tone jump rings (2)
  • Gold tone ear wires (2)
  • Flat nose jewelry pliers
View full details
Project Instructions
Liquid Bakeable Medium: Please make sure your work area is covered and you are not working on an unprotected surface. We recommend working on the Sculpey® Oven Safe Work Mat, wax paper, metal baking sheet, or disposable foil. Uncured Liquid Bakable Medium may damage unprotected furniture or finished surfaces. Be sure to cover your crafting area appropriately Please make sure your work area is covered and you are not working on an unprotected surface. We recommend working on the Sculpey® Oven Safe Work Mat, wax paper, metal baking sheet, or disposable foil. Uncured Liquid Polymer Clay may damage unprotected furniture or finished surfaces. Be sure to cover your crafting area appropriately. - Stir Liquid Sculpey® completely. Thin with Sculpey® Liquid Clay Softener as needed - Wash hands after use (we have found that baby wipes work best)

    Baking:
• It is important to use oven thermometer when you bake the liquids so that you can ensure your oven is at the correct temperature. • Do not microwave the liquids. They must be baked in a Preheated oven at 275 ºF (130 ºC) for liquid colors and 300 ºF (149 ºC) for Clear – Do not exceed baking temperatures. • If your piece is less than 1/4” bake for 15 minutes. For thicker pieces that are 1/4” or above bake for 30 minutes. • If your liquid project has become yellowed or discolored in the oven, when you remake it, tent it by placing either – folding an index card in half and placing your project under it or by using aluminum foil over your project.
If you notice that the Translucent Amber Liquid Sculpey® is too thick, you can thin it by adding a few drops of Clay Softener & Thinner to the bottle and mixing it in completely.

Add Translucent Amber LS to both sides of the post in the open oval shape. Make sure that the area around the little post is completely filled. It’s important because we want the area around the post to be strong so that it will hold the jump ring later during assembly.
Add more Translucent Amber LS to the mold filling to about the halfway point. Right now, the mold does not need to be filled to level. The Amber is just now being used to mark the space that it will occupy at the top of the shape.
Next use the tip of the Needle Tool to make sure the corners of the mold shape are free of bubbles. Do this by inserting the tip of the needle all the way down into the corner through the LS. Drag the needle through the LS staying in the corner space all the way around the outside corner and also around the inside corner. Then allow the Amber LS to settle back into place. Do not drag the Needle Tool beyond the Amber LS area.

Fill the bottom half of the shape with Clear LS but do not fill it all the way level. Leave some space for adding the flowers.
Next it is time to add the flowers. Since most flower materials are too large for this size and shape mold, I cut them up into little pieces with sharp scissors. Then I sprinkled the flower bits onto the Clear LS in the mold.
You can add as many flower pieces as you like. In this tutorial I am using tiny snippets of dried flowers. You can see in the final finished photo how the earrings might look if you use larger pieces as well.
Next add more Clear LS to the mold on top of the flowers filling the mold to level. Check to make sure the Amber area is level as well. If not, add a little more Amber LS so that both areas are level.
Bake the mold at 300F for 30 minutes. I bake at this temperature even for the Amber LS to get the pieces as clear as possible. You can see right away when you take it out of the oven that the Amber color has deepened quite a bit and the Clear is much clearer.

As soon as I take the mold out of the oven, I use a heat gun on “HI” to make it even more clear and shiny. Using the heat gun while the piece is already hot from the oven, makes the process much faster since the mold is already hot. Be sure to use hand protection while handling hot items. I leave the piece in the mold to allow the mold to support the piece while I heat it with the heat gun. Hold the heat gun about 4 inches away from the mold. Place the heat setting on HI and move the heat constantly in a circular motion over the mold. You will see the surface of the baked piece take on a shine. When you see the shine, remove the heat. Allow the piece to cool in the mold before removing it.
In this photo, the piece on the left is the front side that was face up in the mold. The piece on the right shows the back side that was face down in the mold.
Flip the piece face side down and replace it in the mold. Then repeat the process with the heat gun to make this side shiny as well. Allow the piece to cool in the mold before removing it.
You will need to repeat the entire process to make two of these large earring pieces since there is only one of these large shapes in the mold.
Here’s a look at another set that I made using both the tiny flower pieces and a larger flower piece. It’s best to always test your ideas with a small amount of LS before going to your finished project. The large flowers I used in the top set were actually light pink before placing in the LS. The dark magenta flowers were deep purple. Both LS and heat can alter the color of some flowers which is best to know before beginning the project.
Finish the earrings with jump rings and ear wires using flat nose pliers as shown.