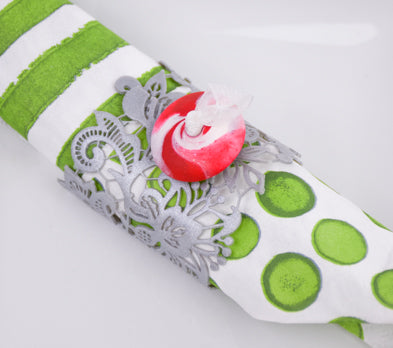
Liquid Sculpey® and Sculpey Premo™ Lace Napkin Ring
Liquid Sculpey® and Sculpey Premo™ Lace Napkin Ring
Designed by Amy Koranek
Read More
Read Less
What a festive way to decorate your holiday table this year! These Liquid Sculpey® and Sculpey PremoTM lace napkin rings are a snap to make using our Sculpey Lace Mold.
TIME TO COMPLETE:60 Minutes to make and bake
ADDITIONAL SUPPLIES
- Paper towel
- 8” Coordinating ribbon
- Scissors

Project Instructions
Please make sure your work area is covered and you are not working on an unprotected surface. We recommend working on the Sculpey® Oven Safe Work Mat, wax paper, metal baking sheet, or disposable foil. Uncured Liquid Polymer Clay may damage unprotected furniture or finished surfaces. Be sure to cover your crafting area appropriately.
Getting Started with Premo Clay:
Start with clean hands, unwrap and knead clay until soft and smooth, or condition by running clay though a Pasta Machine. We recommend using a designated machine for clay purposes only. When working with multiple colors, clean hands with soap and water or baby wipes (we have found that baby wipes work best) before switching colors. Shape clay, pressing pieces firmly together. Wash hands after use.
Getting Started with Liquid Sculpey
Stir Liquid Sculpey® completely. Thin with Sculpey® Liquid Clay Softener as needed - Wash hands after use (we have found that baby wipes work best) .
Getting Started with Premo Clay:
Start with clean hands, unwrap and knead clay until soft and smooth, or condition by running clay though a Pasta Machine. We recommend using a designated machine for clay purposes only. When working with multiple colors, clean hands with soap and water or baby wipes (we have found that baby wipes work best) before switching colors. Shape clay, pressing pieces firmly together. Wash hands after use.
- Baking:
Getting Started with Liquid Sculpey
Stir Liquid Sculpey® completely. Thin with Sculpey® Liquid Clay Softener as needed - Wash hands after use (we have found that baby wipes work best) .
- Baking:
After stirring the Silver Liquid Sculpey® (LS) completely, squirt a puddle into the center of the Lace Mold. Use either your fingertip or the included squeegee to spread the LS evenly into all the crevices of the Lace Mold. Squeegee off as much of the excess LS as possible and return it to the open bottle.
Remove excess LS from your fingertips and the squeegee with paper towel.
Remove excess LS from your fingertips and the squeegee with paper towel.

Remove 1/32 from bar of the Red Glitter PremoTM and 1/32 from the bar of Frost White Glitter PremoTM. To make a 1/32 size piece, just divide one fourth of the bar into eight equal pieces. Condition each of the little pieces well and marble them together into a ball.

Position the ball of marbled clay under the Sculpey ToolsTM Lentil Bead Maker. Apply just enough pressure to the ball of clay with the Lentil Bead Maker to keep the ball from rolling away. The decorative bead that we are going to make as the topper for the napkin ring is called a Lentil Bead.
Please read the following instructions through Step 6 before proceeding. This technique can take some practice but once you have it down, you will enjoy making both Bi-Cone and Lentil Beads using marbled scrap clays.
To create the Lentil Bead, grasp the Lentil Bead Maker by two corners and carefully and slowly move the tool in a circular motion so that the ball of clay is spun in circles between the Lentil Bead Maker and the work surface. Always keep the Lentil Bead Maker moving in a circular motion while you hold it parallel to the work surface.

After a while you will notice that the ball of clay has turned into a bi-cone shape. Do not remove the Lentil Bead Maker when this happens! I have only removed the Lentil Bead Maker so that you can clearly see the bi-cone shape that the clay has become.
After many more revolutions, you will also notice that the clay is swirling toward the center or toward the tip of the point on the top. This is also happening on the other side of the clay that is touching the work surface. The swirling happens because the clay is sticking slightly to the Lentil Bead Maker and also to the work surface as you are moving the Lentil Bead Maker in circular motions. If you don’t see swirling, try applying a little more pressure to the Lentil Bead maker. You can also try making your circlular motions a little larger.
Once you start moving in circular motions, it’s important to keep doing so until you like the swirls that you see in the clay. This can take 20+ revolutions to achieve the beautiful swirling design.

When you like the amount of swirling that the clay has made, gradually make your circular motion smaller and smaller and apply slightly more pressure. As you do so, the bi-cone shape will flatten out into a lentil shape - thick in the middle and thinner at the edges.
Remove the Lentil Bead Maker and poke a hole through the center of the bead with the Needle Tool. Ream the hole large enough so that your doubled ribbon will easily thread through the hole after baking.
Bake both the bead and the filled Lace mold following the baking instructions for Sculpey PremoTM.

When the mold is completely cool, gently flex it to release the Silver Lace design.

For the napkin ring we are going to use the entire molded piece. It is just the right length to go around a napkin.

Flip the Lace design over so that the back side is facing up. Thread the ribbon through an open hole on each end of the Lace design pulling the lace gently into a loose circle.

Poke both ends of the ribbon through the hole in the lentil bead. Position the lentil bead directly over the seam between the two edges of the Lace design.

Tie an overhand knot in the ribbon and snug it down to the lentil bead. Trim the ends of the ribbon.

Add a napkin to complete the design. Repeat for as many napkin rings as you need.


