
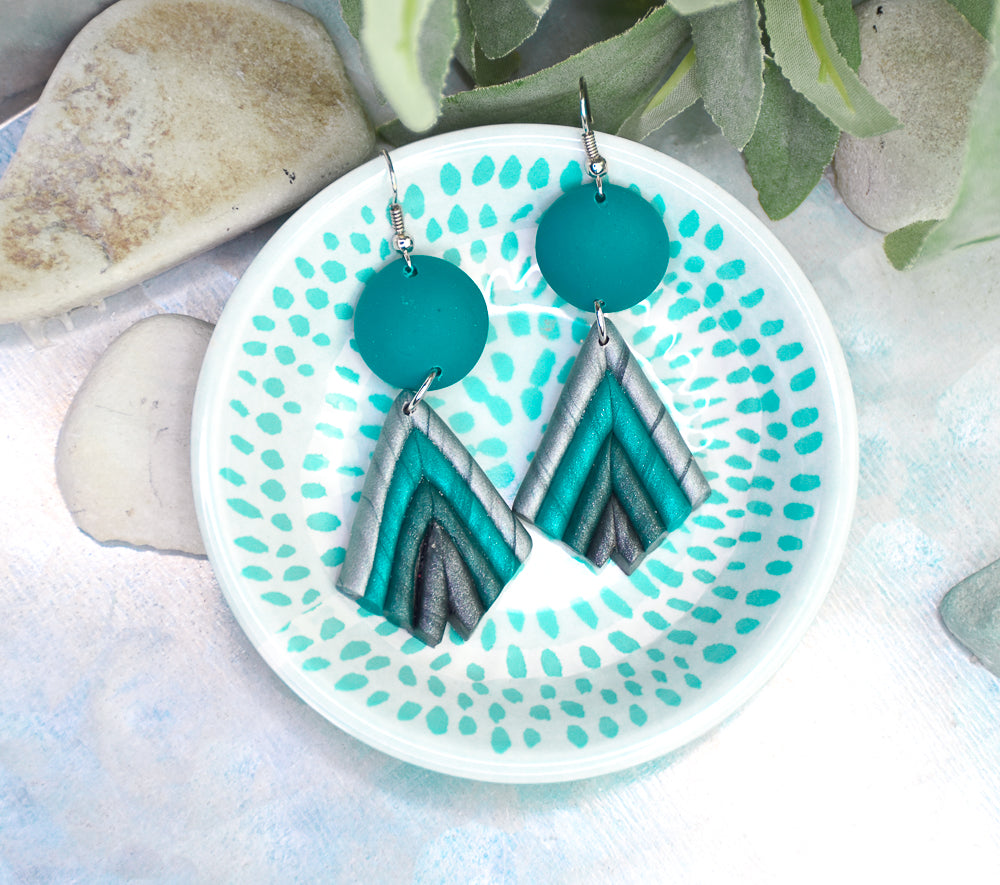
Sculpey Premo™ Arrow Earrings
Sculpey Premo™ Arrow Earrings
Designed by Amy Koranek
Read More
The mica trails produced in the colors look so lovely and add depth to the finished design in these arrow inspired earrings.
COMPLETION TIME:
60 Minutes to make, bake, and assemble
Read Less
ADDITIONAL SUPPLIES
- Silver tone ear wires (2)
- 6 mm Silver tone jump rings (2)
- Flat nose pliers
Project Instructions
- Getting Started:
Start with clean hands, unwrap and knead clay until soft and smooth, or condition by running clay though a Pasta Machine. We recommend using a designated machine for clay purposes only. When working with multiple colors, clean hands with soap and water or baby wipes (we have found that baby wipes work best) before switching colors. Shape clay, pressing pieces firmly together. Wash hands after use.
- Baking:
Make the buttons first that go at the top of the earrings. Press a small ball of Premo™ Teal into the smallest circle shape in the Cabochon Mold. Make sure the clay fills the small circle shape completely and shave away excess clay with a Clay Blade. Carefully de-mold the small circle by flexing the mold. Repeat to make a second small circle cabochon. Set these aside for now.

Make the custom mixed colors next. Combine 1/32 bar Teal with 1/32 bar Silver completely to make Silver Teal. Combine 1/32 bar Teal with 1/32 bar Graphite Pearl completely to make Graphite Teal.

Divide the Silver Teal and the Graphite Teal in half to make two little ropes.
Make two little ropes of each Silver, and Graphite Pearl using 1/16 bar of each color.
When you make the ropes, roll the clay till smooth and then gently twist each rope. When you twist, roll one rope moving your right hand forward and the other rope moving your left hand forward. In this way the mica twists in the ropes will be twisting in opposite directions and you will have two opposing ropes in each color as shown.

Cut each rope in half at an angle using the Clay Blade.

Meet each opposing rope at an angle in the center.

Pinch the opposing ropes together as shown.

Nest the ropes as shown with Silver on the top, then Silver Teal, then Graphite Teal, then Graphite Pearl at the bottom.

Repeat Steps 5-8 to make another set of nested ropes.

Layout the earrings as shown with the cabochon buttons at the top. Trim the bottoms of the nested ropes as shown.

Poke holes in the clay pieces as shown so that they can accommodate the findings. Bake the clay pieces including the cabochon buttons following the baking instructions for Sculpey Premo™. Allow to cool completely before handling.

Assemble the earrings as shown using flat nose pliers.
