
Sculpey Premo™ and Composi Mold Collaboration
Sculpey Premo™ and Composi Mold Collaboration
Designed by Amy Koranek
Read More
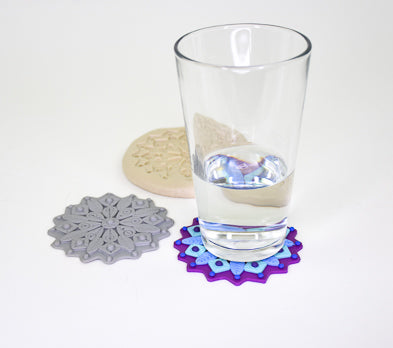
In this tutorial I’ll show you how to create a fun free style mandala. Then you can make a mold using Mold Making Putty, and make the mandala over and over and over again.
Designer’s Note - I used scrap clays to make my mandala and so the colors are going to be a little different from what I have specified in the supply list below.
Read Less
Designer’s Note - I used scrap clays to make my mandala and so the colors are going to be a little different from what I have specified in the supply list below.
ADDITIONAL SUPPLIES
- Ruler
- 4” Circle cutter
- 6 oz. ImPRESSive Putty One Part Re-Usable Mold Making Putty
- Paper towel
- Flat plate
- Deli paper or other barrier paper like copy paper or an index card
Project Instructions
- Getting Started:
Start with clean hands, unwrap and knead clay until soft and smooth, or condition by running clay though a Pasta Machine. We recommend using a designated machine for clay purposes only. When working with multiple colors, clean hands with soap and water or baby wipes (we have found that baby wipes work best) before switching colors. Shape clay, pressing pieces firmly together. Wash hands after use.
- Baking:
We will make a mandala first. As I stated above, I used scrap clays to create my mandala. You can use whatever clays you have since each detail area requires a small amount of clay. In this tutorial, I will call out some colors of clay that are similar to what I used.
Sheet Purple through a pasta machine on the thickest setting or use an Acrylic Clay Roller to flatten Purple to 1/8” thick and about 4” x 4” square.
Place the clay on barrier paper like a deli sheet, or copy paper, or an index card. The barrier between the clay and the work surface will keep the clay from sticking, making it easy to move the design around in front of you so that you can work on each section of the mandala from a straight up and down viewpoint.
Use a ruler and the tip of an Etch ‘n Pearl to score shallow lines to create a center point and guidelines in the clay.

The details for the mandala are created using sheets of clay that are 1/8” thick and cut outs using the Mini Geometric Cutters.
Use the Circle cutter to cut out an Ultramarine Blue circle. Place it directly in the center of the Purple clay. Make a well in the center of the circle with the 12 mm Ball Tool. Use the Large Etch ‘n Pearl to seat a pearl of Purple in the well.
Use the Circle cutter to cut out an Ultramarine Blue circle. Place it directly in the center of the Purple clay. Make a well in the center of the circle with the 12 mm Ball Tool. Use the Large Etch ‘n Pearl to seat a pearl of Purple in the well.

From a 1/8” thick sheet of Cobalt Blue, cut out eight teardrop shapes. Arrange the teardrops as shown radiating from the center. Use your guidelines to help line them up evenly.

From a 1/8” thick sheet of Turquoise, cut out eight elipse shapes. Arrange them around the outside of the teardrops.

From a 1/8” thick sheet of Pale Blue, cut out eight square shapes. Arrange them between the elipses.

Now comes the fun part! The doodling details! In each of the Pale Blue diamonds, I impressed a well using the 6 mm Ball Tool. Then I seated a pearl of Ultramarine Blue in each one using the Large Etch ‘n Pearl. Since I made the pearls a little too small for the Large Etch ‘n Pearl, I got those cool rings around each pearl when I pushed them into place.
Use the tips of the Etch ‘n Pearls to make lots of scored details as shown.
Use the round ends of the Etch ‘n Pearls to create circle impressions. Use the 2 mm Ball Tool to make little dot indents in the centers of the circles and around the middle circle.
Just have fun with it and add as many details as you like. Just make sure that all lines go straight in and straight out of the design so that you do not create undercuts. Undercuts don’t mold well like straight in and out cuts do.

Finally, add a series of Small Etch ‘n Pearl pearls around the outside in Cobalt Blue.
Use a large 4” circle cutter to cut out the basic shape around the outside.
Use a large 4” circle cutter to cut out the basic shape around the outside.

Use the elongated diamond cutter to cut out around the edges between the small pearls.
Peel the mandala off of the barrier paper carefully. Bake the mandala following the baking instructions for Sculpey Premo™. Allow the piece to cool completely before handling.
Peel the mandala off of the barrier paper carefully. Bake the mandala following the baking instructions for Sculpey Premo™. Allow the piece to cool completely before handling.

Follow the instructions included with the Mold Making Putty to get it soft and ready to mold.
Patty the putty out into a thick piece - at least 3/8” thick - and large enough in diameter to contain the baked mandala.
I pattied the putty onto a flat plate so that I could easily move it out of my way for it’s curing time.
I pattied the putty onto a flat plate so that I could easily move it out of my way for it’s curing time.

Using hand pressure, imbed the baked clay mandala face down in the putty.

Make sure all the areas have been pushed into the putty and that the mandala is level in the putty so that the edges are molded as well as the interior design.

Allow the putty to dry until it is stiff to the touch and the clay piece is ready to release easily from it - at least 4 hours.

Release the mandala from the mold completely.

If there is an excess of activator (clear liquid) leaking out of the mold, wipe it away with paper towel before re-molding. At this point the mold will still be flexible.
Make a ball of whatever color clay you would like to mold. Here I’m using Concrete Sculpey Soufflé™. Make the ball large enough to fill the mold space.
Place the ball directly in the center of the mold.
Make a ball of whatever color clay you would like to mold. Here I’m using Concrete Sculpey Soufflé™. Make the ball large enough to fill the mold space.
Place the ball directly in the center of the mold.

Using heavy fingertip pressure, flatten the ball from the center working outward.

Keep working from the center outward flattening the ball into all the details.

Once you have spread the clay all the way to the edges, carefully move the clay away from the outer edge by pushing it back toward the center. You can also trim away excess clay with the Clay Blade. Smooth the interior clay with fingertip buffing.

Carefully flex the mold so that you can release the clay design from it.

Inspect the molded clay to see if you need to touch up any of the details with your tools.

Bake the molded piece following the baking instructions for the clay that you used in the mold. The putty mold should not be placed in the oven - only the oven bake clay piece.
The putty mold can be used over and over to create more mandalas, or you can re-use it (following the mold making instructions) to make an entirely new mold.
The putty mold can be used over and over to create more mandalas, or you can re-use it (following the mold making instructions) to make an entirely new mold.

- Choosing a selection results in a full page refresh.
- Opens in a new window.