It’s been over 25 years since I first discovered Polymer Clay. It was such an “ah-ha” moment for me and I haven’t looked back since. My specialty is figurative work, portrait commissions and Christmas characters like Santa and Elves. My style leans towards realism and I also teach my techniques to aspiring figurative artists.
Although most of you have some experience with polymer clay, I thought in today’s blog I would go over some polymer clay basics, and talk about a few things that perhaps I do a little differently.
Conditioning Clay

- We all know the importance of conditioning polymer clay. Trying to use polymer straight out of the package might result in projects that are brittle and crumbly. By kneading and massaging the clay, those plasticizers get pulled and stretched and ultimately make your clay stronger as well as softening it and making it more manageable. Sometimes the clay is old and may have dried out. For this there are a few little tricks you can use. My never-fail solution is a small $10 mini food processor. You can pick one up at Walmart or Target. Sometimes all you need to do is break the clay into little pieces and pulse a few times, however, if it’s still too hard to use, add a few drops of a softener like Sculpey Clay Softener or even Liquid Sculpey. In a real pinch, I’ve been known to use a smearing of petroleum jelly.
- There’s also the chance that your clay might be too soft. This can be because it’s either a very fresh batch, or the plasticizers have not been worked in well. If, after conditioning, you find it’s still too soft, spread it out and sandwich it between two layers of bond paper to absorb some of the plasticizers. Be careful you don’t leach too much oil out or your clay will be brittle. Sometimes it’s enough to leave it out to air for a day or two, but always remember to protect it from any dirt and dust by tenting a piece of parchment paper over it.
Storage
- I’ve found that the best way to store clay is in freezer bags or plastic containers. Never use cling wrap! What I’ve found is that whatever makes cling wrap stretchy also breaks down the clay and makes it sticky, so I stay away from cling wrap.
- There are so many tools out there that you can use with polymer clay, and Sculpey has a great assortment to choose from. Really, any sculpting tools work, from plastic to wood, from leather embossing to knitting needles. However, my favorites will always be the stainless-steel tools. The cold metal glides easily and keeps the clay from over responding to the touch. It doesn’t drag or cause pilings on the surface. They are easy to clean and they last a long time. Regardless, don’t limit yourself, every artist should have a variety of tools in their stash.
Your Work Surface
- The surface you work on is very important. A smooth ceramic tile is ideal. It stays cold; it’s flat and smooth; you can place the tile in the oven without worrying about it warping like a cookie sheet and finally, it’s very easy to clean. Another option are those flexible plastic cutting boards from the Dollar Store. They are large, usually 10” x 14” with a smooth side that’s easy to clean and if I mess up the surface with my knife it’s no big deal to replace. But don’t put this in the oven – it’s for working on only.
Keep things Clean

- I keep things clean with 99% Isopropyl Alcohol. Available at most drug stores as a topical antiseptic it’s great to use sparingly with a brush on whatever you’re sculpting to smooth and clean the surface. Just be careful not to use too much because it can break down the clay. At 99% proof it evaporates very quickly. I also use 99% Alcohol with a paper towel to clean my work surface and my pasta machine. Clay can build up in your pasta machine and will streak your new clay if you don’t clean it regularly. I dampen a paper towel with the alcohol and run it through the machine several times. It’s amazing what collects in the nooks and crannies of the rollers. If you don’t have 99% Isopropyl Alcohol, an alcohol based hand sanitizer works well too.
Sculpting Polymer Clay Figures
Once we have followed all of these basic steps we can begin creating polymer clay figures.
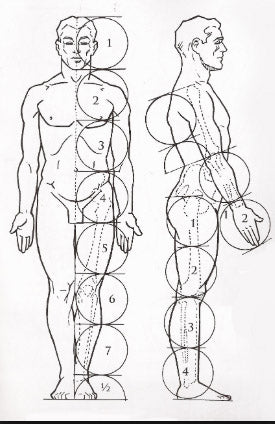
To start creating polymer clay figures, I like to sculpt the head first, then use the length of the head to determine the size of the hands and feet. After that I start mapping out the body. At this point I have a pretty good idea of what, or who, my character is. This is important because it determines how much you manipulate the body proportion formula.
 If you took art in high school you may remember the rule that the average human body is approximately 7.5 head lengths tall. If you follow this formula and you have sculpted a 3” head, your character should therefore be approximately 22.5” tall. But the reality is that we are all different. If you look around you, some people have regular sized heads on short bodies, which may translate into a formula of only 6 or 6.5 head lengths. While your fashion model friend may be 8 head lengths tall, and your average super hero may be 9 heads tall.

An example of these variations can be seen in a piece from my Chef collection called “Wine and Cheese”. (Living Doll, Super Sculpey, wood, wire and textiles).
Details of a Sitting Clay Figure
When working on a character that is sitting down there are a few other things to consider. One of the biggest mistakes people make in a s

itting character is to round the buttocks. This can cause instability and just doesn’t look natural. When we sit down the weight of our bodies flatten our buttocks and the back of our thighs. To make sure my character sits properly, I use a flat wooden disk as the surface I build this upper body on. The “Scrabble Player” sits flatly on the chair surface and I don’t worry about him rolling or falling out of the chair.
Another good rule to follow in determining proportion on a sitting body is that the distance from the shoulder to the sitting surface is the same as the distance from the buttocks to the knee, and from the knee to the bottom of the foot. Once again, this is just an average guide. Some people are long waisted, some are short waisted, but if you start with the average guideline, you can then tweak and adjust based on the character you are working on.


One last note on proportion. Our brains often compensate to see things in proportion even when they are not. Michelangelo used this theory in his sculpture “La Pieta” that sits in the Vatican in Rome. It’s a life size emotional scene where Mary holds her son’s body on her lap. Michelangelo knew that Mary’s smaller body would disappear behind the male frame in front of her, so he adjusted the proportions and camouflaged it behind the fabric folds of her dress. It is not immediately obvious, but once you are aware it you can’t not see it. If you were to stand the two figures upright, she would stand 7.5’ tall compared to his height of 6’.
Adding Colour to Figures

- There are several ways to add tones to a facial sculpt. My favourite way is using make-up powders like blushes and eyeshadows to add a flush to the cheeks or define some of the details of the face. What I like about using powders is that it gets absorbed into the clay during the baking process and diffuses so it’s a much more subtle and natural look. It doesn’t look like paint sitting on top of clay. There’s nothing wrong with that look, but if you are going for a more realistic effect I think powders do the trick. Some artists are using Genesis heat set oil paints which also gives a beautiful finish, but is a more expensive product. Chalk pastels are another good choice. I’ve even heard of people using ground up spices to create dark undertones.
For myself – I like make-up powders and I get great results with this. My advice however when you use make-up powders is to go a little darker than you actually want, because it does lighten and diffuse in the oven.
Support and Armature
- Aluminum foil is a great product to use for creating armatures. I use it to create the skull armature for my head sculpts. There’s an expansion and reduction rate of 2% so you don’t have to worry about it expanding and cracking your work.
- For bodies, aluminum foil over a wire armature further strengthens the core of your work. For bodies, I like to use old hanger wires – they are cheap and readily available but they are also very strong.
- For hand armatures I’ll use the white hanger wire which is a little thinner and lighter or I’ll use 18 or 20-gauge floral wire, sometimes doubled and twisted. Floral wire is easier to reposition than hanger wire.
- If I’m sculpting something with appendages that are fragile, I often insert wire or even sewing needles into them to create strength and stability. For example, a pointy elf ear might break easily after it’s baked, so to strengthen it I will insert a straight pin or sewing needle straight down from the tip of the ear into the head before baking. I’ll do the same thing with small hands. Sometimes you need a much stronger option for support.
I hope you’ve discovered something helpful and new in my post. A big part of the whole process is learning from one another and developing your own style and techniques. Hopefully you will share this with the next generation of sculptors who are discovering the wonderful world of Polymer Clay. I’ll leave you with one more photo of another portrait commission where you can see the subject with his vignette called “The Doll Maker”. Happy sculpting!


