Every creative person has their secrets, techniques, and tips for making what they do appear even more impressive. A motto I live by is “work smarter, not harder”, which is why I am excited to share the following polymer clay hacks with you. Most of these techniques use everyday household items, so anyone of any skill level should be able to apply them!
- Plastic lids as cutters and for ice cream
This first one is especially useful for beginners who do not have a variety of tools at their disposal. You will need an old lip balm lid, glue stick lid, or plastic straw, depending on the size of your creation. Their thin edges make excellent cutters for bite marks, earrings, and pancakes.

Just be sure to apply some cornstarch on the inside of your makeshift cutters so the clay does not stick. Also wipe them regularly, because depending on the type of plastic they are made of, clay might stick to it and melt the plastic. Though most lids should not have that issue, it is good practice to clean your tools, anyway!
- Baking with cornstarch and tissues
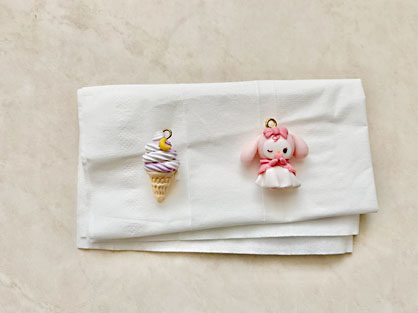
If you are like me and love to make three-dimensional charms such as chibis, ice creams, and animals, you may find this trick very useful. Instead of placing your creation directly on your baking surface, lay it a folded piece of tissue or some corn starch. This will help maintain its shape and not develop a flat bottom when baking.

In case you are wondering, it is completely safe to bake corn starch and tissues in the oven. They will not burn or catch fire, especially if you bake them at the low temperature polymer clay requires.
- Epoxy resin and super glue for findings
When making jewelry and pins to sell, it is crucial to ensure the findings are properly secured. A common concern I have faced in the past is customers thinking polymer clay creations are too fragile. Super glue is a popular option among beginners, but it is not the sturdiest adhesive. Epoxy resin is my go-to for securing eyepins, pins backs, and hair clips. It is stronger than most glues and even UV resin, and it is what I would recommend to anyone. However, one gripe I have with epoxy resin is that the finding may slide around during its 24-hour cure time. Thus, I like to combine super glue and epoxy resin: I secure the hardware with a small dab of super glue first, because it dries very quickly before surrounding it with epoxy resin.
Below is a pair of earrings, the left one having been coated with epoxy resin and the right one with just super glue.

- Freeze cake slices before texturing
Miniature sweets are one of my favorite things to make–there are endless texture and color varieties to be experimented with and when you send photos to people, they often confuse it for real food. This particular hack is one I swear by, and it is to freeze your cake slices before texturing them with a needle tool. You only need to do it for 5-10 minutes, depending on the temperature of your freezer, and you will notice a significant difference when texturing.

- Double-sided tape and popsicle sticks for painting
This last hack is one I rarely see people using. It uses only a popsicle stick and some double-sided tape and has saved me much hassle when painting and glazing flat creations.

All you have to do is cover about 80-90% of the flat side of a popsicle stick with the tape, leaving a bit of space at the end so you can still hold the stick. Then, you can simply adhere your pins, earrings, or any item with a flat side to the tape, and paint and glaze them.

The tape prevents it from sliding around and eliminates the need to hold the creation and get your hands covered in paint or glaze. If you would like to store your popsicle stick and re-use it in the future, you can cut a strip of wax paper or sticker paper and place it on the tape side. This prevents it from collecting dust and sticking to your other tools!
If you try any of these hacks, please use #HowDoYouSculpey and share your creations on social media! Don’t forget to hashtag the type of clay you’re using as well (ie. #premo #liquidsculpey). Good luck and have fun!


