Setting up expectations with Sculpey clays can be daunting when students become sweet little vultures as they rush to grab supplies and start their Sculpey projects. Even my high schoolers get overly excited to create! Over the many years that I have taught polymer clay in my classroom, I have revised my systems in order to make the process much more enjoyable for myself and the kids. In order to set my students up for success, I start the project with a demonstration on a few tips and tricks to using polymer clay. Please feel free to use my list to help your next demo or edit and use as you please!
- Clay will soften as you mold it and warm it up in your hands. If you feel like it is really hard to work with, keep “mushing” it around until it is more flexible. If the clay becomes too flexible, put it down to “cool off” for just a little bit.
- Clay is like a magnet, it will pick up everything it touches. Whenever you start working with the clay, make sure your hands and table are clean! **Silicone mats are great but can be pricey. If you are on a budget, I have found paper plates to be a great workspace where students can store clay and write their name easily to be seen.
- Our fingernails will get in the way a lot for this project. I advise students to cut fingernails if possible (most won’t, especially your girls) OR I tell them how to smooth the clay by slowly rubbing the clay until the marks or dents are gone. This usually leads me into craftsmanship with polymer clay about smoothing over your clay to be oven ready, proportions are correct, colors are thought out, and the project can hold itself up if applicable.
- Polymer clay comes in many colors, but you can make many more colors by mixing different clays. I tell students that if they are going to mix, they must ask the teacher first and report why it is necessary and how much they will need. I started doing this because even my high schoolers would mix a color and make entirely way too much and no other students would need it or students would run out of a color and I would help them make a color if possible.
- Clay expands and condenses when baking. Therefore, I warn my students that this can be helpful but also cause problems. I demonstrate how to properly attach appendages to bodies via toothpicks if possible or by “slipping and scoring, then wedging” the clay together. I give them examples of poor joints and how they will break off in the oven. **This is very important to talk about and demonstrate and will save you a lot of tears over broken projects!
- My demonstration includes a few other smaller things like portioning out the clay for multiples like legs or arms, horns, etc. so that they are the same size. Rolling out clay so it doesn’t get too skinny in portions. Flattening clay with a roller to have the same thickness all around. These tips and tricks change depending on the age group of my kids and if I have had them for multiple years. Students know that their table will have a set of clay tools that they will share with their table mates as well.
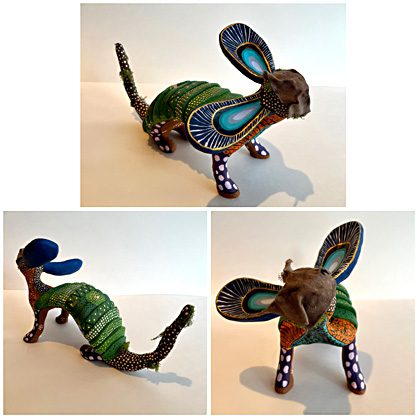
Lastly, I end my demonstration with a plethora of ideas for students to get inspired by. I show them how the clay can be paired with other art supplies like creating mobiles, jewelry, and even used as smaller parts to a larger sculpture. (High school level here) I also show them how they can create games like tic tac toe pieces, math manipulatives, etc. Giving my students choice in what they create has really helped them be more original and creative when working with the clay. Here are two high school students' polymer clay projects. The armadillo project was done with white polymer clay that was later hand painted after being baked. She created the armature using wire and foil then covered it in the clay, moss and cloth.
The winged girl on the wood stump was created using a wire and foil armature that was then covered in paper mache. The student then hot glued all the floral pieces to the bodice of the girl to create a more whimsical and flowing dress. I love to show examples of polymer clay being used in unique ways in hopes to widen the creativity our students tap into.

One of the most important things I learned over the years was having my students plan out their polymer clay projects and when I say plan, I mean detailed planning. My students draw out their ideas and then they come to me with a list of colors they will need and approximately how much. This helps students grab what they need and not double or triple the amount making other students upset when they can’t find the color they wanted as well. Students know that they may need to be flexible on colors in case we run out but I think there was only one year that happened because everyone was obsessed with red flowers that year. Whenever I order clay, I have found that buying the large variety packs of Sculpey III® clay has been most helpful. Every 3-5 years, I assess what clay is leftover and I may buy individual colors or smaller packs as needed. Creating with Sculpey clays has become a highlight of the school year for most of my students. They enjoy working 3D and having a smooth surface without the traditional clay sensory issues that can arise. It is sure to be a hit in your classroom. Just remember to set expectations first and foremost and the rest will go seemingly well! Happy creating! Kaylee Jo Davis

